The Way Data Pros Utilize PyCaret
PyCaret is an open-source, low-code machine-learning model library. It is designed to make machine learning more accessible to everyone, regardless of their experience level. PyCaret simplifies the end-to-end machine learning workflow, making building, evaluating, and deploying machine learning models easier. PyCaret is a model management tool that automates data processing, feature engineering, model feature selection, model optimization, and other machine learning workflow transformation steps. This article will explore how PyCaret can help you with experiments and classification tasks using the UCI Blood Donation dataset.

Getting Started with PyCaret
Before diving into the code, we must install PyCaret 3 and the necessary dependencies. Install the full version of PyCaret that comes with all the optional dependencies:
It will install optional dependencies not required for the projects. Alternatively, you can install PyCaret with the hard and optional dependencies that you need as you work on the project:
You can find how to install other optional dependencies you may need for your project on the official PyCaret site. For this article, install in line with the full version.
The blood donation dataset
The blood donation dataset is publicly available on the UC Irvine machine learning repository. This is a complete dataset with various attributes related to blood donation, including recency (months since last donation), frequency (total number of donations), monetary (total blood donated in c.c.), time (month since first donation), and a binary class target variable (0—not donating, 1 - donating). You can import and load the entire dataset with the following code:
Setting up, preprocessing, and EDA
The PyCaret functional API is arranged in modules. Before you can run any other function in a particular module, you must first initialize the model training environment and create the transformation pipeline with the import setup function:
The input variables are numerical, while the target variable is binary. You have also identified the target variable with the target parameter. The preprocess parameter is set to true so that you can preprocess the input, and the transformation parameter is also true to transform these numerical parameters into Guassian-like.
As you see from the exploratory data analysis, the dataset has more Class 0 entries. The fix_imbalance parameter is set to true to help synthetically create a balanced dataset with the default SMOTE. You can change the imbalance estimator to the one of your choice with the fix_imbalance_method parameter.
The setup function has already processed the dataset for you by specifying the necessary parameters. This would take several lines of code in traditional machine learning. After setting up the environment, you can perform the exploratory data analysis with the eda function:
You get an interactive dashboard to explore the relationships between your categorical features. You can change the display format to svg if you prefer static plots.
With few lines of code, you have performed the data preprocessing and the exploratory data analysis. Training different machine learning models and comparing their performance with PyCaret is even easier.
Train, compare, evaluate, predict, finalize, and save
With the compare_models function, you can train different classification models and evaluate various custom metrics:
The n_select parameter default value is 1. So, the compare_models function returns the trained model with the highest accuracy score. When the n_select parameter is set to a value greater than 1, the compare_models function returns a list of the trained models.
You can use the get_params() method to view the parameters of the model:
If you are interested in training a particular model, you can do it with the create_model function:
After training, the plot_model function will help evaluate the model in the graphic format:
Instead of making several plots, you can view all the plots available to you with the evaluate_model function in one line:
After model evaluation, you can predict with the model:
The probability_threshold parameter has a default value 0.5 to determine a particular entry's class. You can increase or decrease the value of this parameter depending on your problem.
If you are satisfied with your prediction, you can finalize and save your model. You finalize your model by training on the complete dataset with the finalize_model function, and you save the final model with the save_model function:
Changing the AdaBoostClassifier base estimator and Tuning the model
PyCaret is interoperable with Scikit-Learn and other popular machine-learning libraries. You can see all the classifiers available to you on PyCaret with the models function:
The AdaBoostClassifier is from Scikit-Learn. The documentation shows that the default estimator of this classifier is DecisionTreeClassifier. You can change the default by specifying the base_estimator parameter when you create AdaBoostClassifier. You cannot, however, change the base_estimator to any classifier. It must be a weak learner:
You can turn your model with the tune_model function. All you need to do is to list the hyperparameters of the model for tuning:
As shown before, you can evaluate and predict with your tuned model with the appropriate functions.
Stacking classifiers
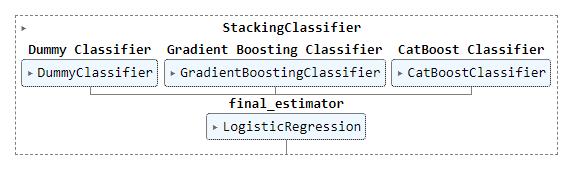
Stacking is an ensemble technique that outputs several classifiers to train another model, also called a meta-estimator. Envision stacking as a two-layer model. The training data introduces all the models in the first layer. The model's output is that the first layer trains the meta-estimator in the second layer, which is then used to make the prediction.
Let's see how stacking works with the top3 classifiers you already trained:
The figure below shows how the stack_models function trains the default final_estimator, LogisticRegression, on the outputs of the top3 classifiers:
You can change the meta-estimator from the default. In the following code, the meta-estimator was altered to an MLPClassifier:
You can stack other models of your choice by placing the trained model in a list. In the following example:
Conclusion
PyCaret is an exceptional tool that simplifies the complex process of machine learning. Its low-code approach allows beginners and experienced data scientists to navigate the entire workflow easily. PyCaret automates critical steps in the machine-learning process, from data preprocessing to fine-tuning, making it an efficient and time-saving choice. This article explored how PyCaret can be used for classification tasks with the UCI Blood Donation dataset, showcasing its user-friendly features.
You can do much more with PyCaret than we have discussed in this article. You can explore the PyCaret documentation for more. Learn about the other data science and machine learning libraries that will enable you to properly use PyCaret in our Introduction to Data Science, Machine Learning Algorithms from Scratch, and Pandas for Data Analysis tracks.
like this
Create a free account to access the full topic

