Testing Python Code 101 with PyTest and PyCharm
All our programs must be well-designed, well-written, and reliable to perform their functions as intended. Testing is a critical element in software development, with the unit testing framework being the most common type. Unit tests focus on the program's basic building blocks, such as functions and methods in the classes. Unit tests are often created simultaneously with the source code to be tested; in the Test-driven Development (TDD) approach, unit tests come before the actual program code. Ready-made libraries are available to help create and run unit tests. One of the most popular of these libraries in the Python environment is PyTest.
In our journey to the secrets of testing Python programs with the PyTest standard library, we will follow the story of Riley—a young, promising programmer who knows Python quite well but still needs to practice with unit tests and using the PyCharm IDE.
Let’s begin!

Congratulations Riley! Welcome on board. You will work on the Python project called The Lifehack Assistant, which aims to help users in everyday life.
Your first task is to fetch the username, sanitize it according to specific rules, and return the welcome string.
Use is the current version of Python (3.11 as of now), PyCharm IDE (version 2023.1.2 with a wide range of additional helpful plugins), and the PyTest library (7.3.1).
Part #1. Before You Begin—Set up the Environment
Initially, the project does not require sophisticated frameworks or libraries, so pure Python seems sensible. Let’s place this project into a new folder named, for example, PyTestWelcome01, like below. Remember to hit the Create button 😉.
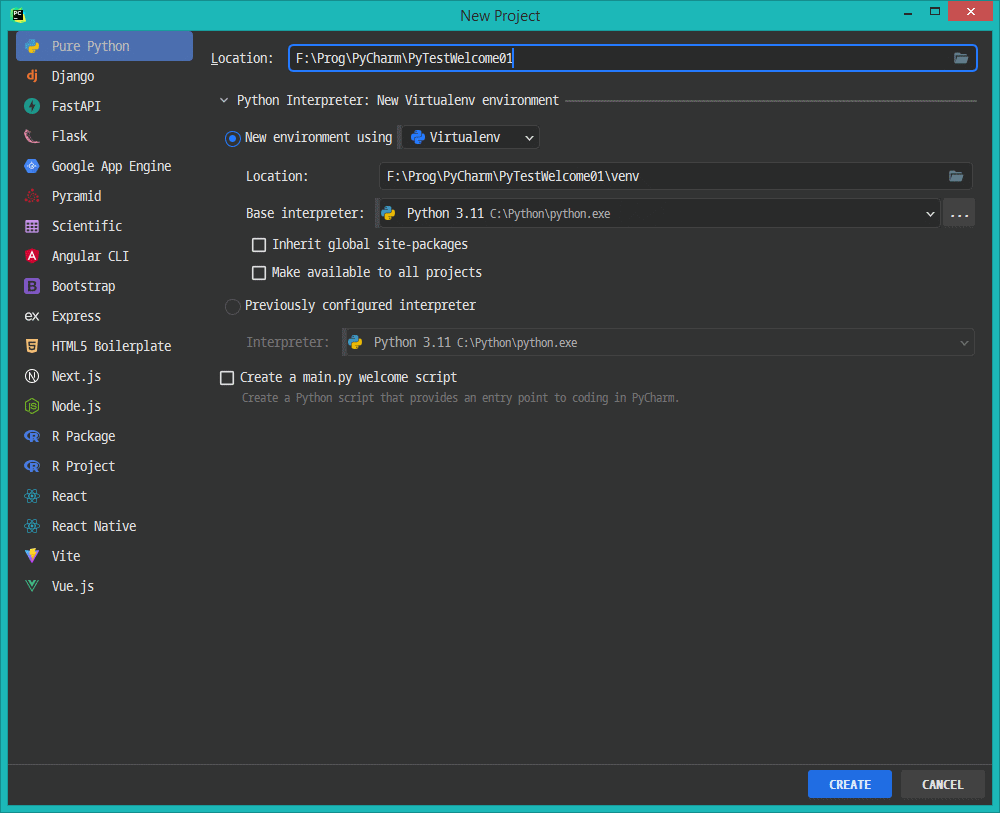
Creating a new virtual environment whenever you create a new Python project is always a good decision. It will help you avoid incompatibility issues when the system-wide libraries are upgraded or replaced with other solutions.
We have an empty project created with a clean environment. In PyCharm, we can preview its structure in the Project window. In most cases, it is on the left side of the PyCharm main window or, when collapsed, it can be accessed by clicking the computer screen icon, pressing the Alt-1 keyboard shortcut, or in the View🡪Tool Windows🡪Project menu.
Now it’s time to create the main Python script file. Right-click on the project name in the Project window and choose New and Python File:

You can do the same by pressing Alt-Insert and choosing the Python File option from the dropdown menu or File🡪New🡪Python File from the main menu.
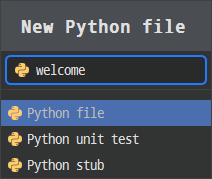
The following window allows you to name this new Python file. Let’s name it welcome (for Python files, the default extension is .py)
We can create a basic version of the unit test file in the same fashion; the only difference is that in the last window, choose Python unit test instead of Python file. The name of the second file with tests must differ from that of the main code file. Since they are closely related, they should also be quite similar.
Riley named the test file check_welcome.py. It is possible, but it’s not an optimal choice. We'll discuss it later.
Let’s revise the project state, what is inside the project folder:
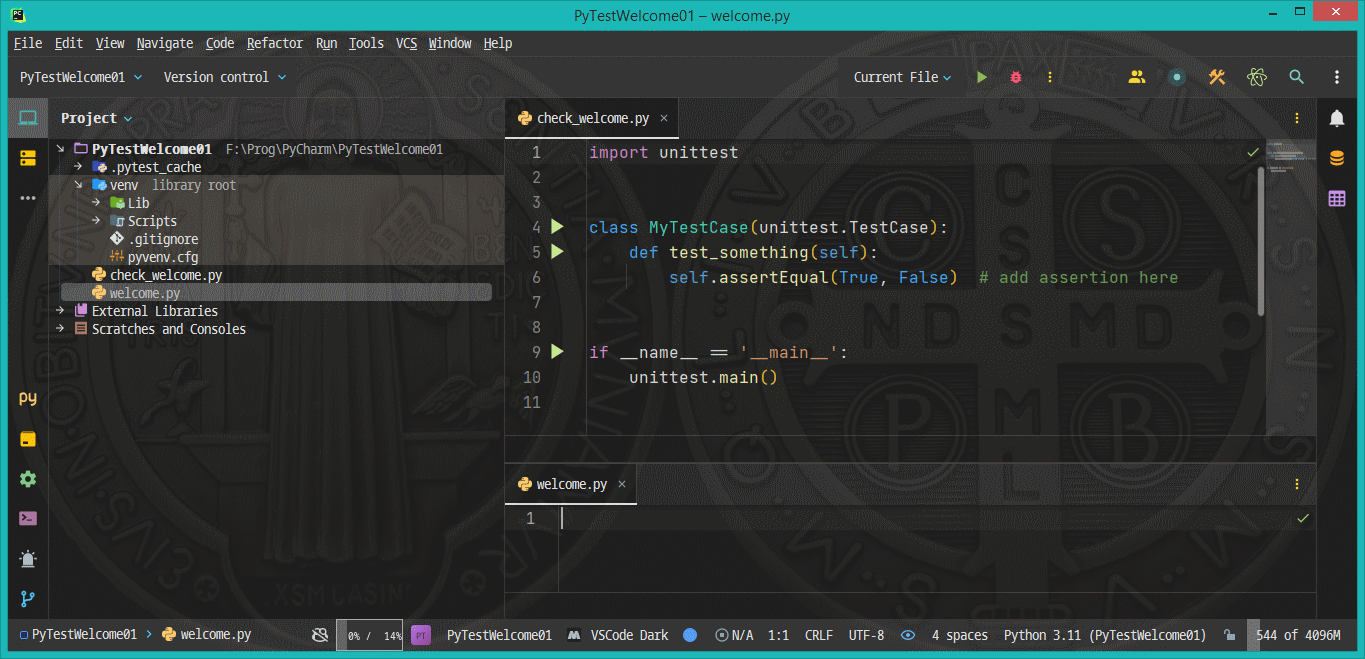
- Some files related to the local Python virtual environment in the venv subfolder,
- Welcome.py, an empty Python script
- Check_welcome.py, a test file, automatically filled with some code samples. We expect that this code is PyTest related, don’t we?
Wait. Have I just said PyTest related? So, why don’t we see the PyTest name anywhere in it?
Why is some strange built-in unittest library imported into this file instead?
Let’s check one more thing:
- Open the terminal window, click the CLI prompt icon on the left side of the PyCharm main window, choose the View🡪Tool Windows🡪Terminal menu item, or press Alt-F12.
- Run the pytest or python -m pytest command

In both cases, the system answer is negative:
the term ‘pytest’ is not recognized… /no module named pytest
PyTest is an external library and is not shipped with the Python interpreter by default, so it should be installed separately.
The simplest way is to write the line: import pytest at the top of one of our python (*.py) files.
At first, the library's name will be underlined red with the symbol of the red bulb. When we click on it or press Alt-Enter, we’ll see the menu with the Install package pytest option. Click it.

If, for some reason, you don’t see this option, open the terminal window, and run the command:
python -m pip install pytest
After a while, a Balloon Popup Window appears, proclaiming that the library was successfully installed. To check if the installation process succeeded, you can open the terminal window and run the command:
pytest --version, or just pytest
You should see the output like this one (the versions of the libraries installed in your system may vary):

The alternative way of installing additional packages in your virtual environment is using PyCharm’s Package Manager, which can be accessed by clicking the package icon on the left border of PyCharm main window or by choosing View🡪Tool Windows🡪Python Packages.
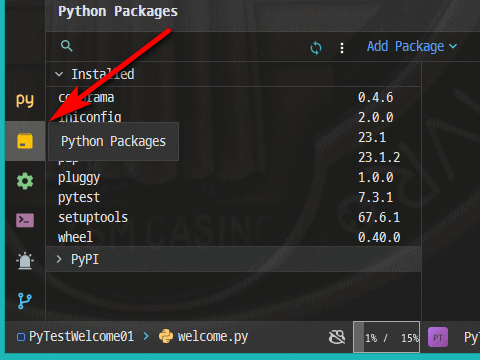
In the Package Manager window, you see pre-installed packages with their versions. With the (⋮) button, you can define additional package repositories, and with the search field next to the magnifying glass icon, you can search for packages through the specified repositories (with the PyPI package repository used as the default one)
We can check if PyCharm recognizes the newly installed pytest library as the default testing framework instead of the default unittest. To do that, we can choose File🡪Settings or press Ctrl+Alt+S.
In the Settings window, find and expand the Tools entry. Pick the Python Integrated Tools option. The pane on the right contains the Testing section with only one item, the Default test runner. There is the Autodetect (pytest) option. It is OK to leave it as it is, but if you trust your custom settings more than the default/automatic ones, you can change it to the pytest value.
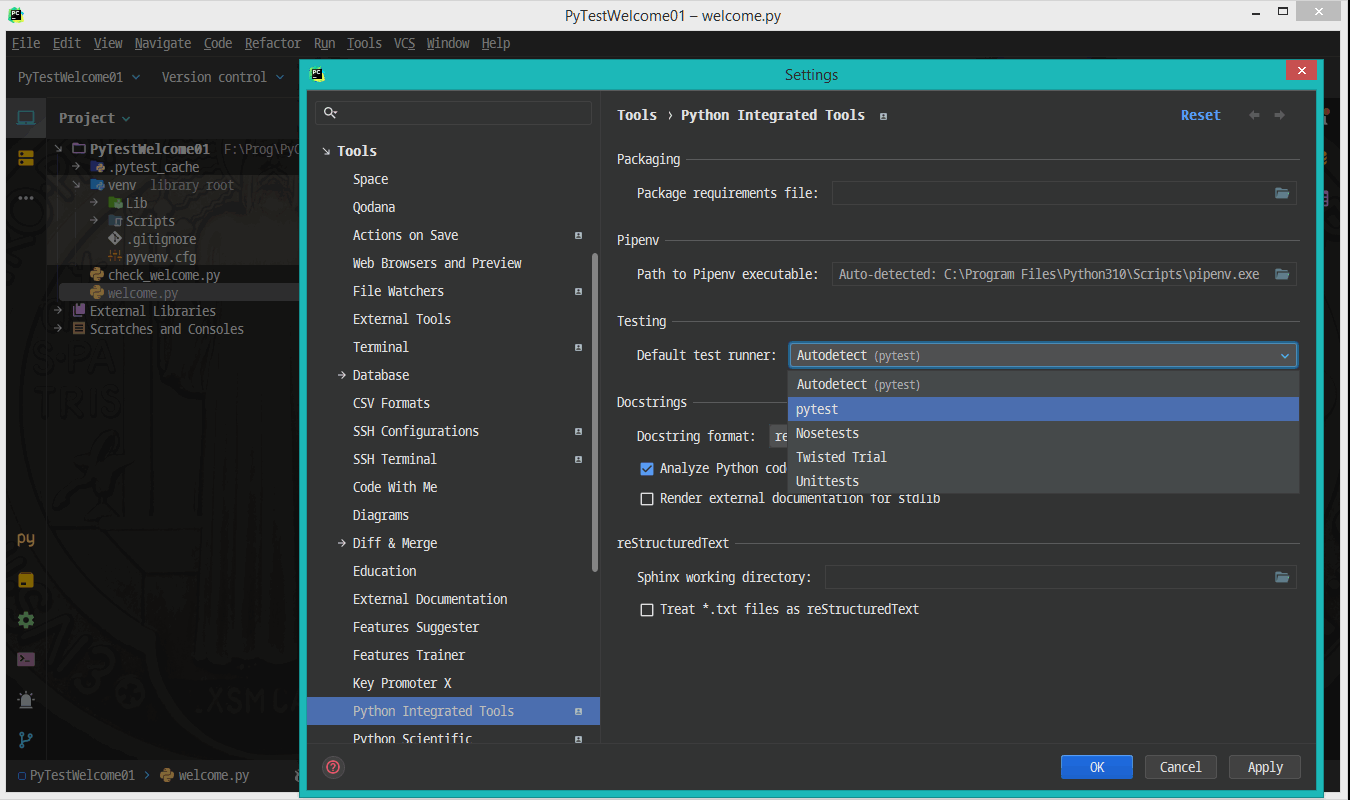
OK, we have all the components necessary to start writing and unit-testing the code of our Python project.
We’ll continue with that in the second part of this little tutorial.
Part #1 Summary
In Part #1 of our little tutorial devoted to unit testing with the PyTest features, we have prepared the environment for further steps:
- We’ve created a new Python project in the PyCharm IDE with a clean virtual Python environment,
- We’ve installed the external PyTest standard library,
- We’ve verified that PyCharm sees and recognizes the freshly installed library as the default test runner,
We have two automatically generated Python files: the main code file, the test code file named by our friend Riley welcome.py, and check_welcome.py, respectively.
Part #2. Preparing the Code
Getting to Know the Requirements
As we probably remember, Riley’s first task is to write and test the code which fetches the user’s name, sanitizes it according to specific rules, and returns the welcome string. Meanwhile, Riley has learned that these rules are:
- The returned string should be: "Hi, <sanitized name>!",
- For any given user name, the sanitized name should be created as follow:
- the given user name should be trimmed; remove every starting and trailing white character,
- if the given user’s name consists of more than one word (where a word is a sequence of non-white characters), replace every sequence of white characters between with a single space character,
- each word should start with a Latin letter or an underscore character followed by a Latin letter, one of A…Z or a..z. The characters that follow can be any non-white characters,
- each word that doesn’t match the rule mentioned above should be replaced with the Anonymous word,
- when the resulting sanitized name contains more than one Anonymous word, only the first one should be kept, and the others should be deleted,
- when the given user name is empty or contains only white characters, the sanitized name should be set to Anonymous.
First attempts
Our friend, Riley's first take on the code fitting these requirements, looks like this:
Riley remembers that the unit test should be prepared and run. As the first attempt, Riley wants to use the check_welcome.py test file, which was auto-generated while setting up the virtual environment in Part #1.
Looking through the documentation of the pytest library, Riley also noticed that code with PyTest is bright enough that you just need to run it, and it will search for all the available test files and execute them.
So, Riley opens the terminal window (in PyCharm, click the CLI Icon or press Alt-F12 (the operation marked as ① in the picture), and runs the pytest command (see the operation marked as ②), like here:
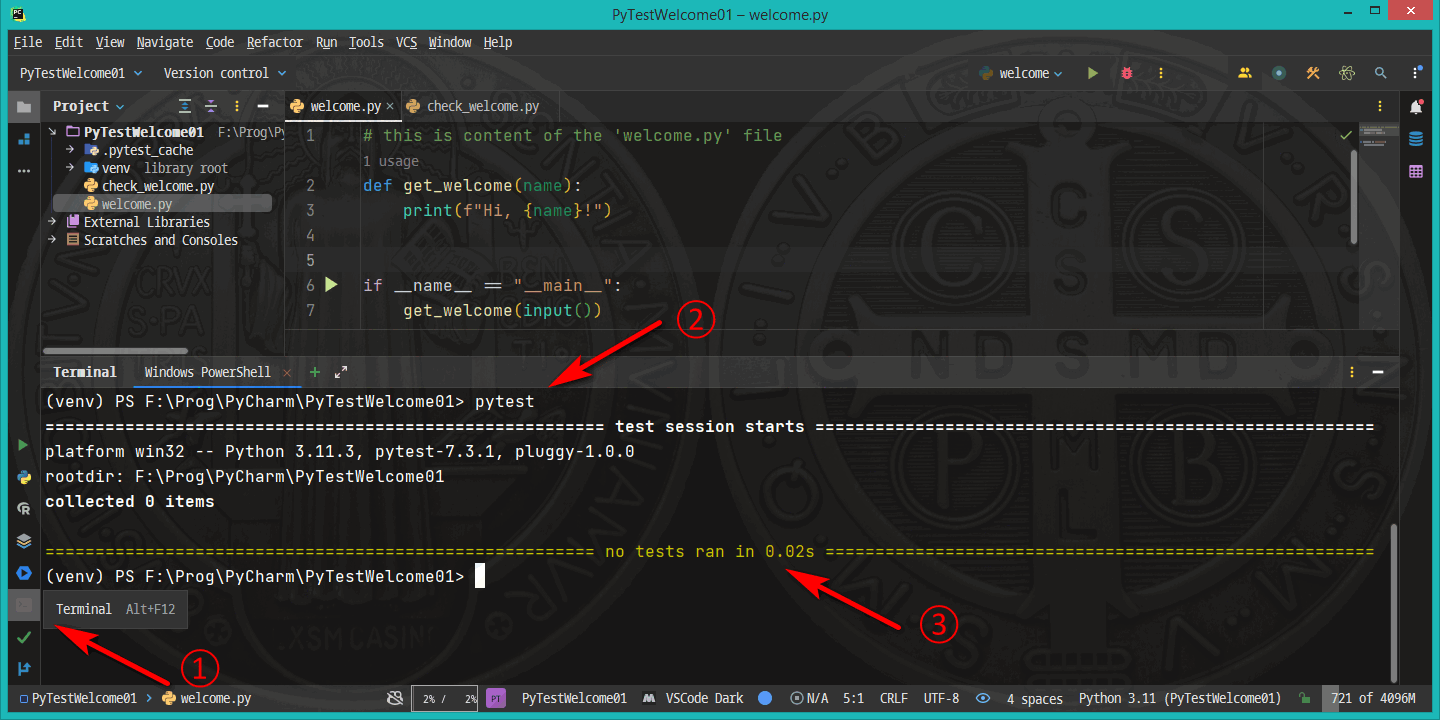
The pytest command was executed, but the output messages (see the operation marked as ③ in the picture) say "collected 0 items" and "no tests ran." What’s going on?
Let’s fix the test file name!
OK, the second look at the pytest’s documentation brings the answer:
pytest will run all files of the form test_*.py or *_test.py in the current directory and its subdirectories.
It means that the name of the test file should be corrected. Let’s try to refactor it—select that file in Pycharm’s Project window (see operation ①) and press Shift-F6.
Or right-click the file’s name, and from the context menu, choose the option Refactor 🡪 Rename (see procedure ②):
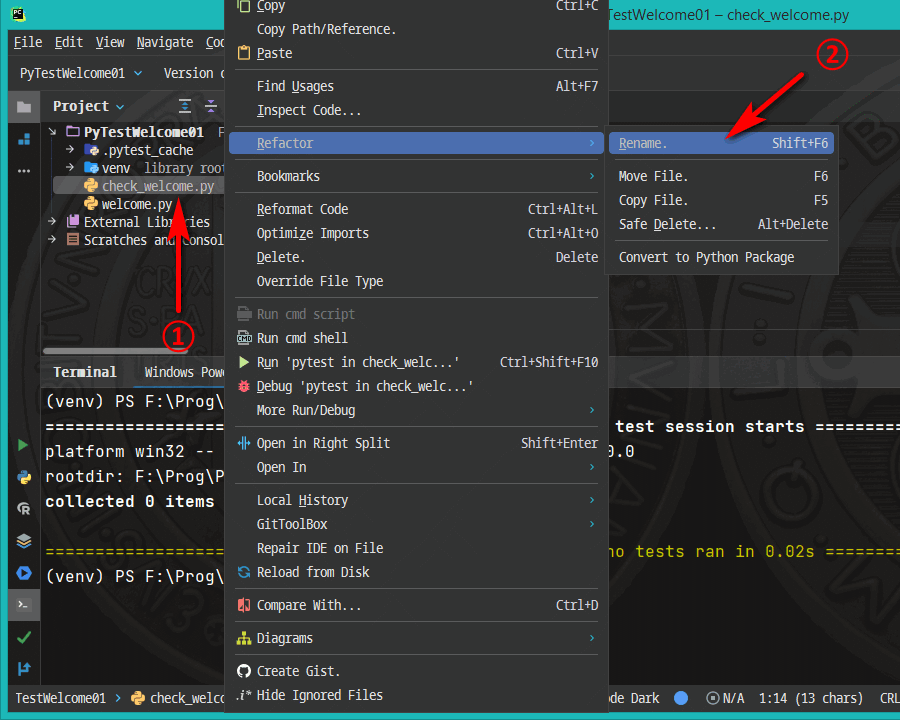
In the next window, enter the new name for that file; the pytest library should recognize, let’s say test_welcome.py, instead of check_welcome.py. Click Refactor.

After that, let’s go back to the PyCharm’s “terminal” window and check if pytest can see and recognize the test file with corrected name:
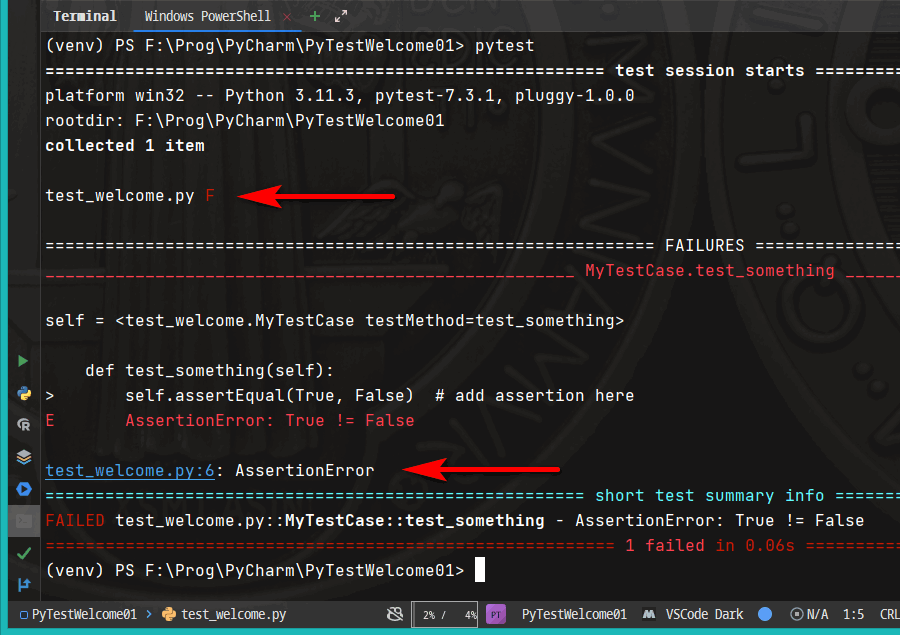
Bingo! Some non-fatal errors remain, but the output messages claim that pytest can see and recognize our test file.
Check out the initial content
Now let's go back to this auto-generated test file (with the already corrected name) and take a closer look at its content:
It does not correspond to our case.
First of all, it was automatically generated before installing the pytest library, and naturally, it does not use this library but the built-in Python unittest library instead.
Second, using the unittest library is a bit complicated. For example:
- it requires creating a class from the unittest.TestCase,
- it has plenty of assert* methods, which you need to memorize and use properly.
Working with the pytest library is much easier:
- you don’t have to create any test classes; using test functions only is OK with the pytest library,
- it is enough to use in tests the Python assert keyword without the necessity of memorizing tons of assert* versions.
We’ve seen that pytest can run the unittest classes and methods, so if you already have ready-made libraries with the unittest test code, you can utilize them with pytest, too.
But for now, let’s put the use of the unittest library aside and go back to the clean pytest code.
Be radical, do not hesitate to delete all the lines of code from the test_welcome.py file and leave it empty.
Prepare yourself
Let’s recall the entry version of the code prepared by Riley:
Let's take a closer look at the get_welcome function. It does two things—it forms a welcome_string and prints it. Riley must compose some unit tests to check it. What does unit, in this case, mean? Something singular, treated as an entity.
The get_welcome function can be improved, though it seems very simple, even naive. In the present form, it violates the S rule from the SOLID design principles, which stands for the single responsibility principle. And the functions which conform to this rule are much more readable and easier to maintain and test.
So, let’s rewrite our code as follows:
Much better!
Create the PyTest template
As you probably remember, we have the test_welcome.py test file recognized by the pytest library—name with empty content. Let’s populate it with the first test code!
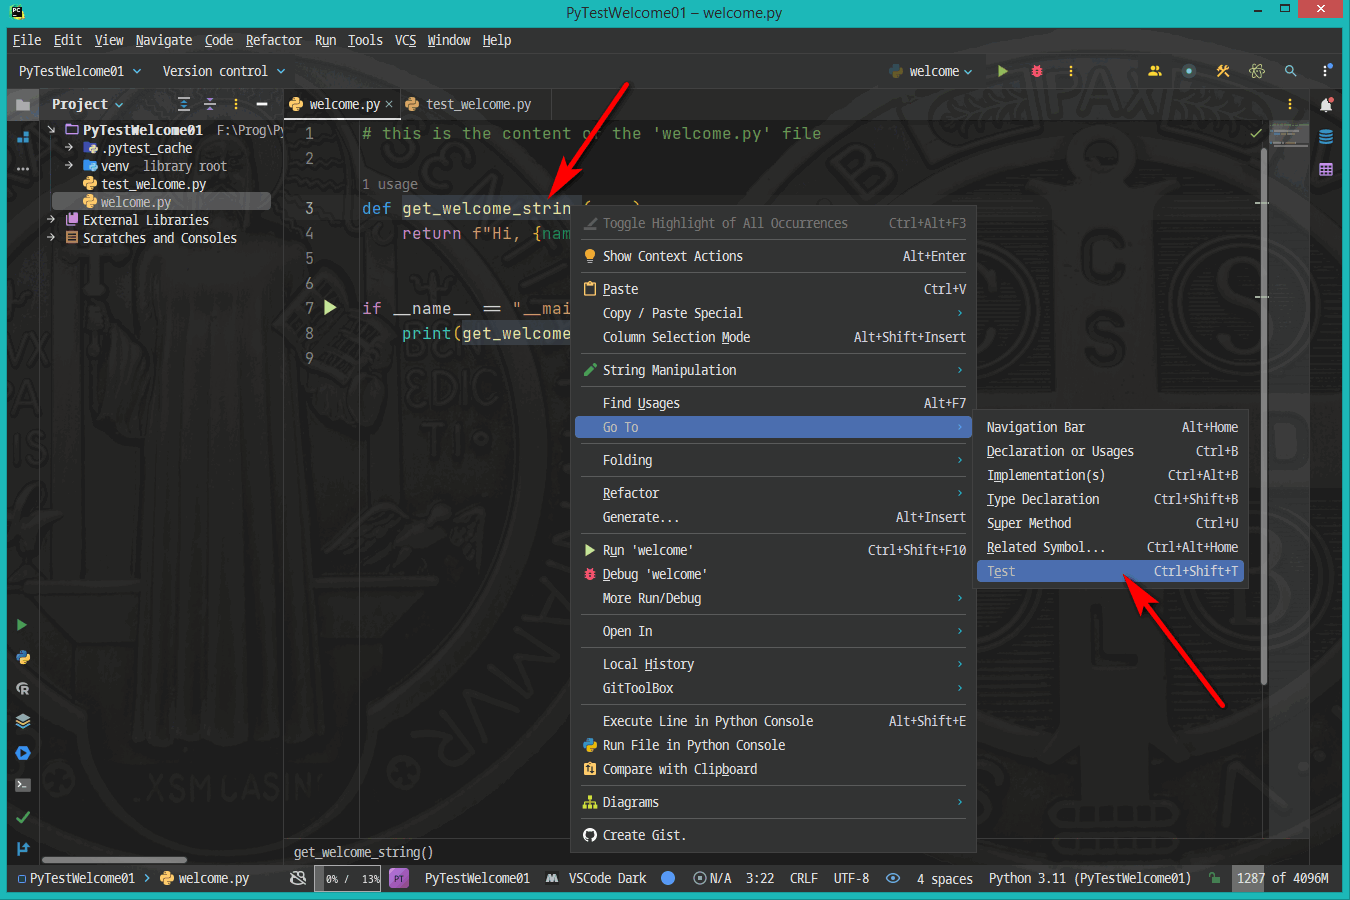
Open the welcome.py file in the IDE editor, right-click the name of our get_welcome_string function, and choose the Go To🡪Test option from the context menu or press Ctrl-Shift-T.
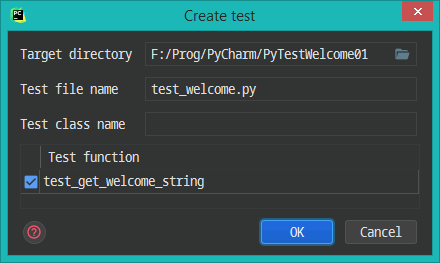
The following window allows us to select the test to visit but choose the Create New Test option.

Then PyCharm tells us the properties of the new test:
- the name of the test file and its directory,
- test class name with the pytest library; it can be empty;
- the name of the test function.
Click or press OK.
It’s a kind of magic—examining the test_welcome.py file, we can spot its newly created content:
It is much simpler than the first unittest version, isn’t it?
Finally, let’s ensure the pytest can see and recognize our new test—open the terminal window, and rerun the pytest command:
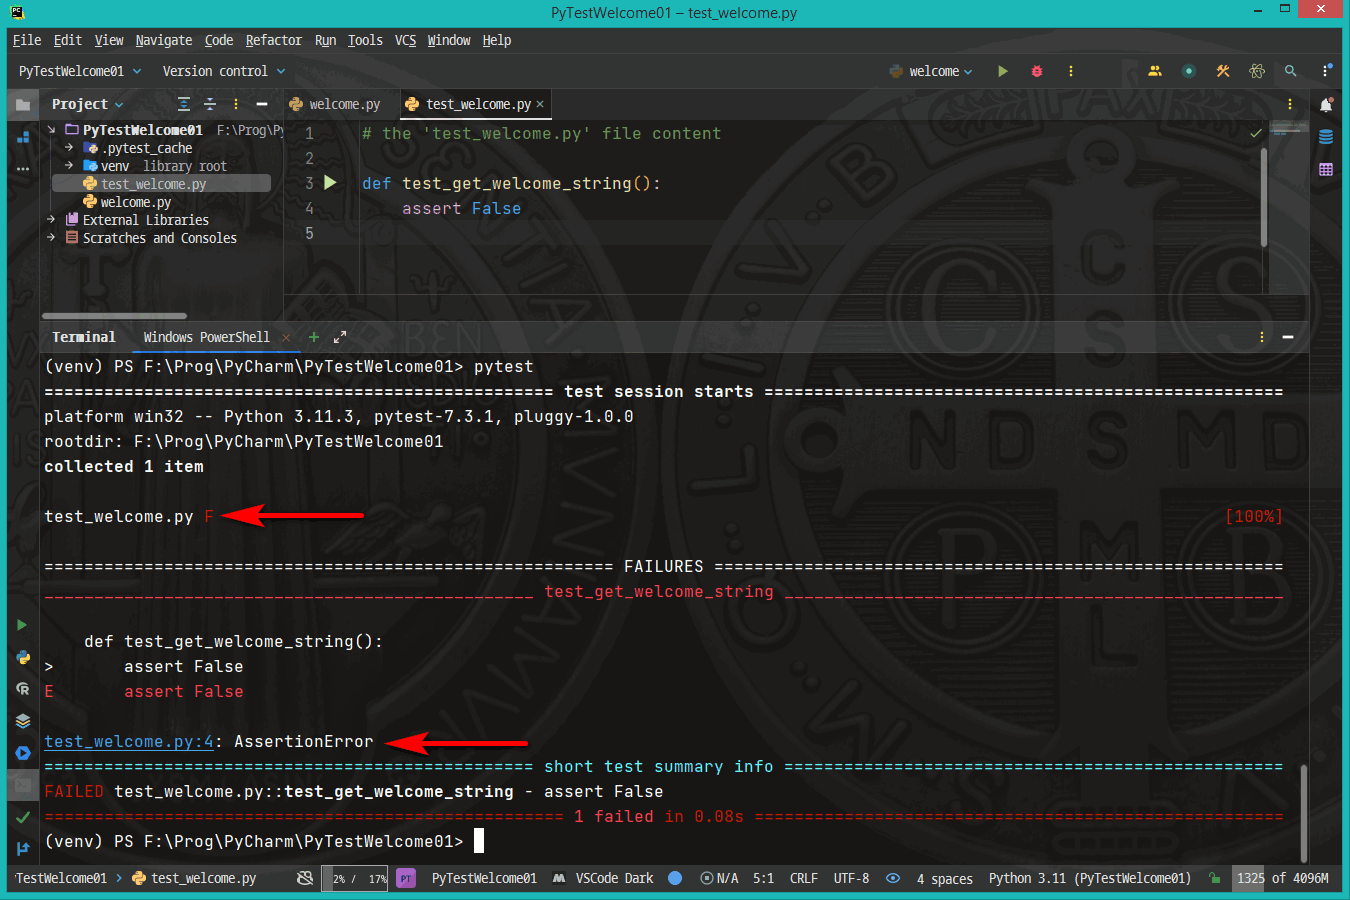
Bingo! Everything works well.
Part #2 Summary
In Part #2 of our little tutorial devoted to unit testing with the PyTest library in the PyCharm IDE, we have done some refactoring to make testing possible but also easy and pleasant:
- we have fixed the name of the test file,
- we have refactored our code to make it better fit the Single Responsibility Principle,
- we have created the template of the first pytest testing function.
In the next part of our mini-tutorial, we’ll start writing the testing code and improving the main code to make it work according to the requirements.
Part #3. Writing the tested function and test function(s) concurrently
Further refactoring of the tested function
After an initial refactoring from the get_welcome function (printing the greetings) to the get_welcome_string function (returning these welcome strings instead of printing them), we can even go further by practicing the single responsibility (the S from SOLID) principle.
Let’s extract one more function, sanitize_name to clean up a username:
And prepare the test template for this new function (right-click its name and choose: Go to 🡪 Test from the context menu or just press Ctrl-Shift-T). Then, in the next window, select Create New Test, and, in the Create test dialog window, confirm the names proposed:
- test_sanitize_name as the name of the test function,
- and the test_welcome.py as the name of the file where it is to be placed.
Great! To check if everything is OK, let’s open the test file test_welcome.py in the editor. The content should look like this:
Two paths to follow
From now on, for a while, we'll mainly focus on the sanitize_name function and its testing function(s).
At the moment, we have two possible ways to proceed:
- we can write the tested function body first, and then the test function(s), or
- we can write the so-called red, not passing test function(s) first, and then, step by step,
improve the tested function until all the tests pass green.
The latter approach, done repeatedly as an iterative process, is known as Test Driven Development (TDD) and is widely used, especially when the tester and the developer are two different people or when the code is developed intensively with plenty of new features added – a more detailed description of this approach is beyond the scope of this tutorial and deserves a separate article. We can choose either of these two paths at the beginning of our testing journey.
Meeting the first requirement
For this tutorial, we can start by writing the body of the tested function. So, let’s look at the first requirement:
Trim the username.
How to do it in Python? Relatively easy:
How to write the test function testing this code?
Naming the functions
First of all, it’s good to remember that testing functions written with the aim of the pytest library are ordinary Python code, and while writing them, we can use all the powerful code editing, code-completion, and debug tests capabilities of the PyCharm IDE.
Second, we already know the naming conventions regarding the test file as a whole. The name should start with the test_ prefix or end with the _test suffix. The naming convention regarding the test functions is a bit more restrictive – these functions to be automatically recognized by the pytest library should have names starting with the test prefix or should be methods located inside the test classes whose names begin with the Test prefix; no suffixes are allowed! On the other hand, the _ (underscore) after the test part is not required, although it is recommended according to the PEP8 guidelines. By the way, the names of the test functions do not have to conform to the names of the functions they test – it is only by convention that in the name of the test function, after the test_ part, the name of the tested function is placed. Generally, it is a good idea to name the test functions descriptively. For example, these are quite good test functions names:
- test_sanitize_name_when_leading_spaces_then_trimmed,
- test_sanitize_name_when_trailing_white_chars_then_trimmed,
- test_add_to_cart_when_item_added_then_cart_contains_item,
- test_account_when_withdraw_too_much_then_should_fail.
It is enough to just look at these names, and we already know:
- what function is tested here and
- what test case is considered.
By the way, PyCharm is smart enough to recognize the test functions named after the convention:
test_<tested function name>_<test case description>
For example, when we have defined such functions:
- the tested function named: sanitize_name,
- and the test function named: test_sanitize_name_when_spaces_then_trimmed
We can right-click the name of the tested function in the editor window – like here:

And in the next window we’ll see the name of the associated test function. We can click that name (press Enter to open the test file with that function in the editor or press Ctrl+Shift+F10 to run the selected test.

Great. The PyCharm IDE sees and recognizes our test function. But it would be even better if this function did something useful, like testing something.
Structure
Let's think a while about what the procedure of testing something should look like:
- prepare some input data or carry out initial setup; for example, create some instance(s) of the tested class,
- specify the expectations for the correct result;
- call the tested function;
- compare the expectations with the actual results;
- in case of failure—fix the function.
To put the same thing in other words, it says that every individual unit test should consist of three phases:
- given—preparation of the test, what precondition must be true,
- when—calling the tested function with some set of input data, obtaining the actual result(s)
- then—comparing the results with expectations.
These phases are also referred to as the G-W-T scenario.
Body
Let’s try to implement the above structure to your function:
In this naive case the given section is empty because the tested function is elementary. We don’t need any sophisticated setup as there are no class instances to make and no database connection to create and populate.
In the when section, we call the tested function with the prepared test input data and obtain its result.
In the then section, we compare obtained results with the expected value.
The pytest library itself does not force the order of the assert function, but PyCharm assumes the actual result goes first, and the expected value follows it:
assert <actual result> == <expected value>
It does not make any difference when the test passes, but affects the messages displayed by PyCharm when the test goes red (not passes).
Run the unittest
We have the sanitize_name function, which should meet the first requirement, and the test function test_sanitize_name_when_spaces_then_trimmed, which should check a name surrounded by spaces. Let’s check how they work together.
There are a couple of ways we can run tests in PyCharm, for example:
- open the terminal window—click the CLI Icon ( ) on the left border of the PyCharm’s window or press Alt+F12, run the pytest command,
- open the test file (test_welcome.py in our case) in the editor and press Ctrl+Shift+F10,
- open the main code file (welcome.py in our case) in the editor, right-click the name of the function (sanitize_name), choose Go to 🡪 Test from the context menu or press Ctrl-Shift-T, select the name of the test function (test_sanitize_name_when_spaces_then_trimmed). See Figure 2 above and press Ctrl+Shift+F10.
There are other ways, for example, running-debug configurations, but let’s put them aside for now.
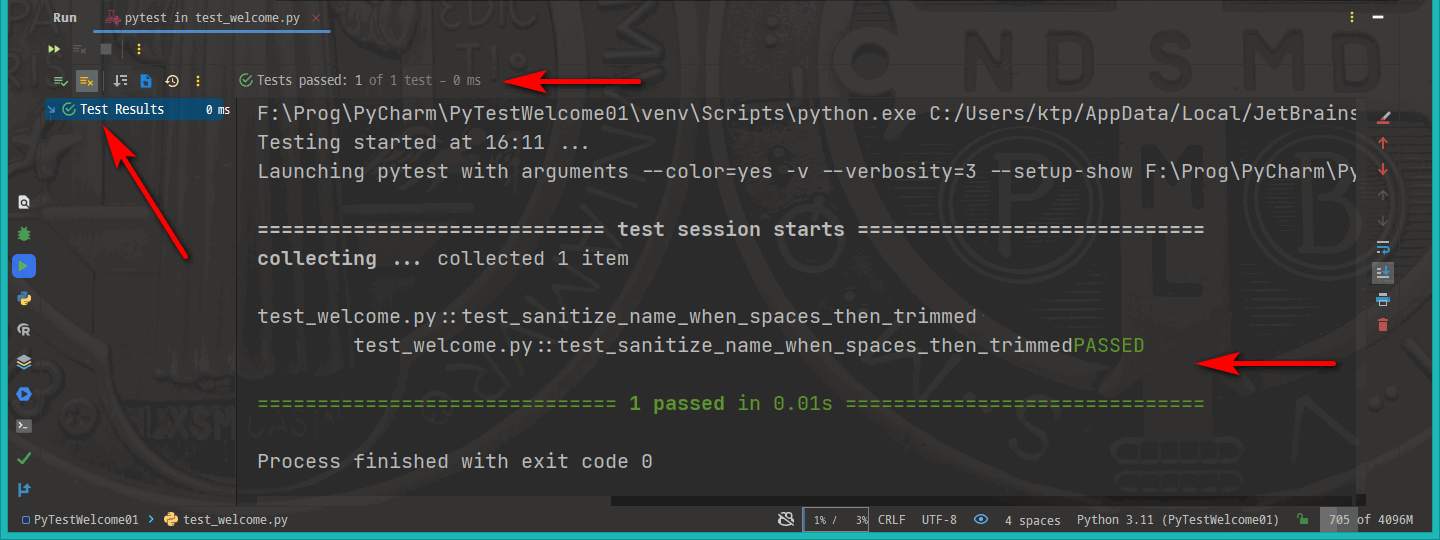
After running the test function, the Run window should be opened with the Pytest successful test report printed:
Since we only have one test function right now, the reports for all tests ran to coincide with the reports for that one function and the information that this test passed green (finished successfully) can be found in as many as three places.
In the future, when we have more test functions, things may not go so smoothly.
(Almost) the same cases
The first test we performed shows that our sanitize_name function handles leading and trailing spaces quite well. But the space is not the only white character possible. For example, tabulators and new line characters are the most common. The tests should check how the tested function handles all of them.
To do so, we can write some more test functions, for example:
After carrying out all these three tests, we will again see a pleasant green color:
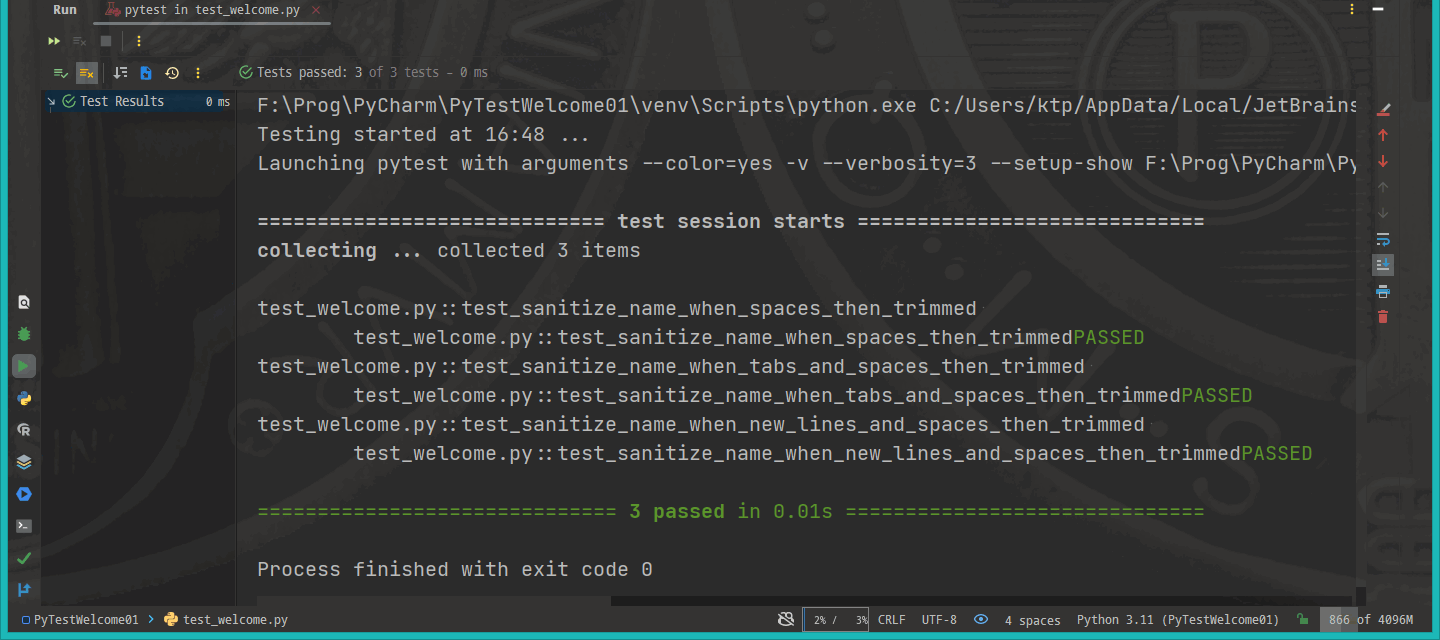
Does that mean we should write the separate test function for every new input parameter used? Fortunately, not!
Parametrization
As the test functions are regular Python functions, we can call them with various parameters. The only difference is that we don’t call them on our own; they are called by the testing framework instead. We must tell Pytest which parameters to use. We can do it with the special built-in Pytest decorator mark.parametrize:
@pytest.mark.parametrize(test_function_parameter_name(s), some_iterable_with_values)
Where:
- test_function_parameter_name(s) denotes the name of the parameter or the names of parameters passed down to the test function
- when the test function accepts only one parameter,
the parameter_name is a string with the name of that parameter: for example, "x" - and when the test function accepts more than one parameter, the parameter_names can be:
- a delimited comma string with the names of these parameters: "x", "y", "z", or
- a sequence (a list or tuple) containing the names of these parameters:
["x", "y", "z"] or ("x", "y", "z")
It is important to remember that the names of variables must match the parameter names. When they do not match, it throws an error.
For example, when we write a simple parametrized test function test_1, accepting one parameter x, and in the decorator, we point the name a instead:
we get an additional error. The test function will not run:
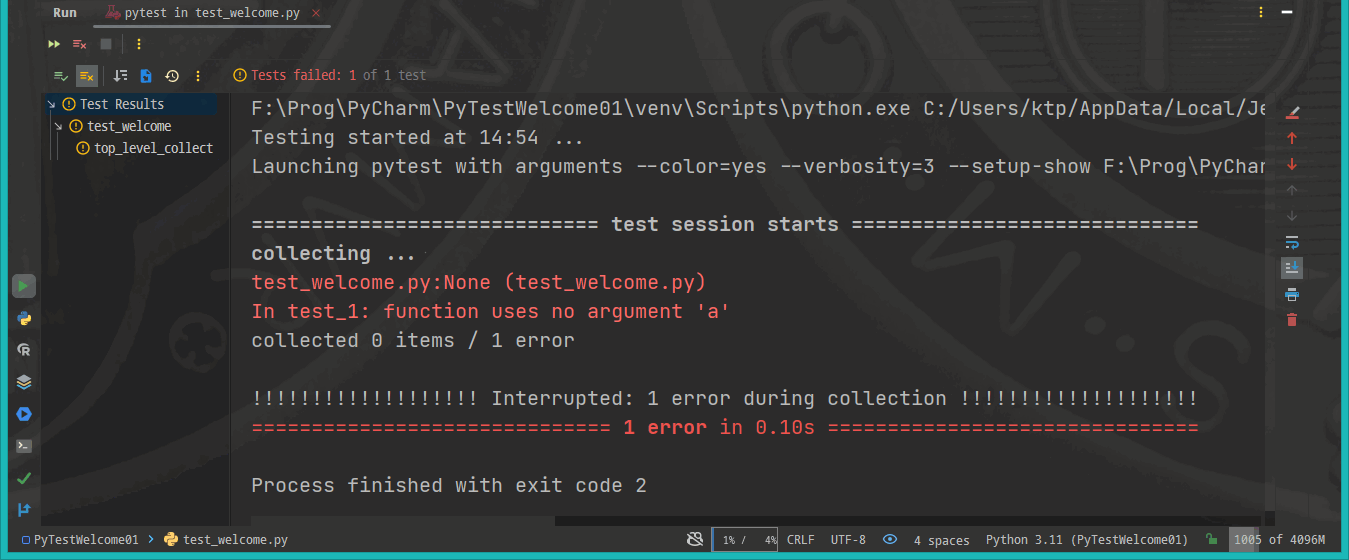
- some_iterable_with_values if the parameter mentioned above (or parameters) should take on subsequent calls to the test function, a list, or the range. When the test_function_parameter_names contains more than one variable, this iterable should contain a series of values for all. For example:
when the parameter_names is a string x, y,
the some_iterable may be a list of 2-element tuples, like here:
[(1, 2), (3, 4), (5, 6), (7, 8)].
Let’s use this knowledge in our code. Instead of preparing a separate test function for every name, try to write one test function with parameters:
By the way, for the @pytest.mark.parametrize decorator to work correctly, we need to import pytest first:
When we run our parametrized test function, we’ll see that it is called as many times, as many parameters we’ve prepared:
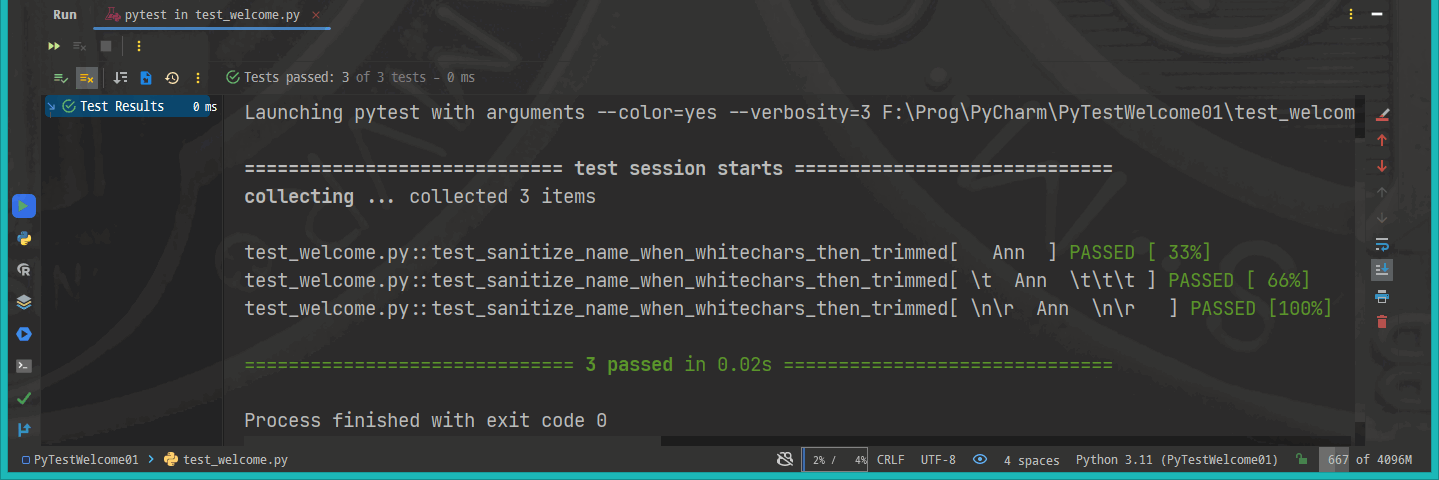
And this time all three cases pass green.
As we can see, the tested sanitize_name function does well with all the common white characters. But the less common white chars need to be tested as well, like ASCII \f (form feed), \v (vertical tabulation) characters or Unicode \u2002 (En space), and \u2003 (Em space) characters. You can find a complete list in the isspace() function article (see the Further readings list at the end). The present version of the sanitize_name function can handle these Unicode space-like characters as well:
\u00A0\u1680\u2000\u2001\u2002\u2003\u2004\u2005\u2006\u2007\u2008\u2009\u200a\u202f\u205f\u3000
Life is not always that easy
So far, all the tests we've run have passes green. Let’s test the trivial case when None is passed to the function as a parameter.
This case is a bit different than the previous ones:
- The None parameter is not of the following shape: <some_white_chars><some_name><some_white_chars>,
- It matches different requirements:
- the given user’s name should be trimmed,
but:
- when the passed user’s name is empty or contains only white characters, the sanitized name should be set to Anonymous,
- The expected result is not extracted from the passed input value, but a brand-new string.
So it is a good idea to write a separate test function to handle this case (and similar ones). It may look like that:
Now when we run our test file, things go different than before
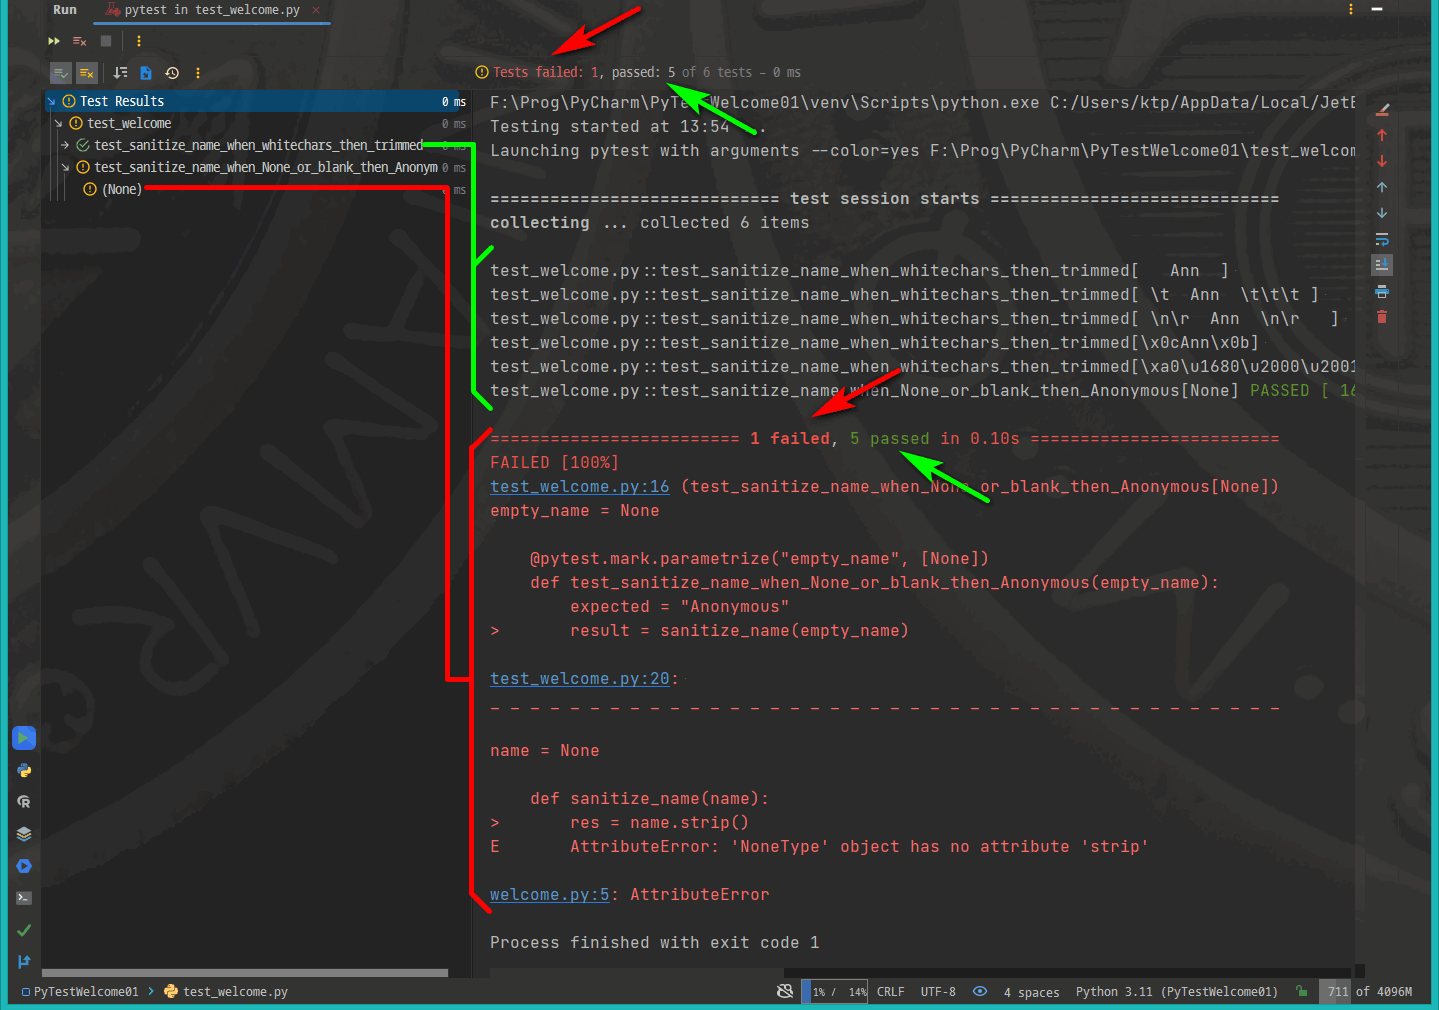
The first part of the test report (marked with the green lines added to the picture) looks familiar, this test still passes green because we didn’t change anything in sanitize_name.
Tthe red lines part is more interesting. It is related to the new test function test_sanitize_name_when_None_or_blank_then_Anonymous. The red color and the words FAILED clearly say the tested function does not handle this case with the None argument.
Let’s take a closer look at these red messages:
- The first red informs us how many of all the tests run were successful (five) and how many failed (one). Please notice that we don’t count here how many test functions we have (there are 2 of them, actually), but how many times they were run
- To understand the section below that separation line better, let’s first take a glance at the line numbers in our test file test_welcome.py:
we can see that:
- test_welcome.py:16 entry corresponds to the beginning of the new test function test_sanitize_name_when_None_or_blank_then_Anonymous, and
- test_welcome.py:20 refers to the exact line, where the error occurred; it was the call of the tested function sanitize_name with its argument empty_name set to None

In this section we can see the actual value of the parameter—None.
After the second red separation line with hyphens devoted to welcomy.py with the tested function sanitize_name definition. The report says the actual value of the parameter name passed to that function while the failed test was run (None). What was the exact place where the error occurred (line #5), and which kind of error (AttributeError) with description.
After comparing the error message to the actual definition of the tested function in the welcome.py file, we see the exact source of the error:

The method strip() is called with the name parameter. As far as this parameter is given some string value, everything goes well, but here we put the None value into it.
And the NoneType, unlike string, does not have the strip() method.
Make the failed pass green
The None value and the exception it causes is also known as the null pointer exception. To fix it, detect and provide some reasonable value of the preferred (string). Take a look at the fixed version of the sanitize_name tested function:
We run the tests (only the second one for simplicity) and…
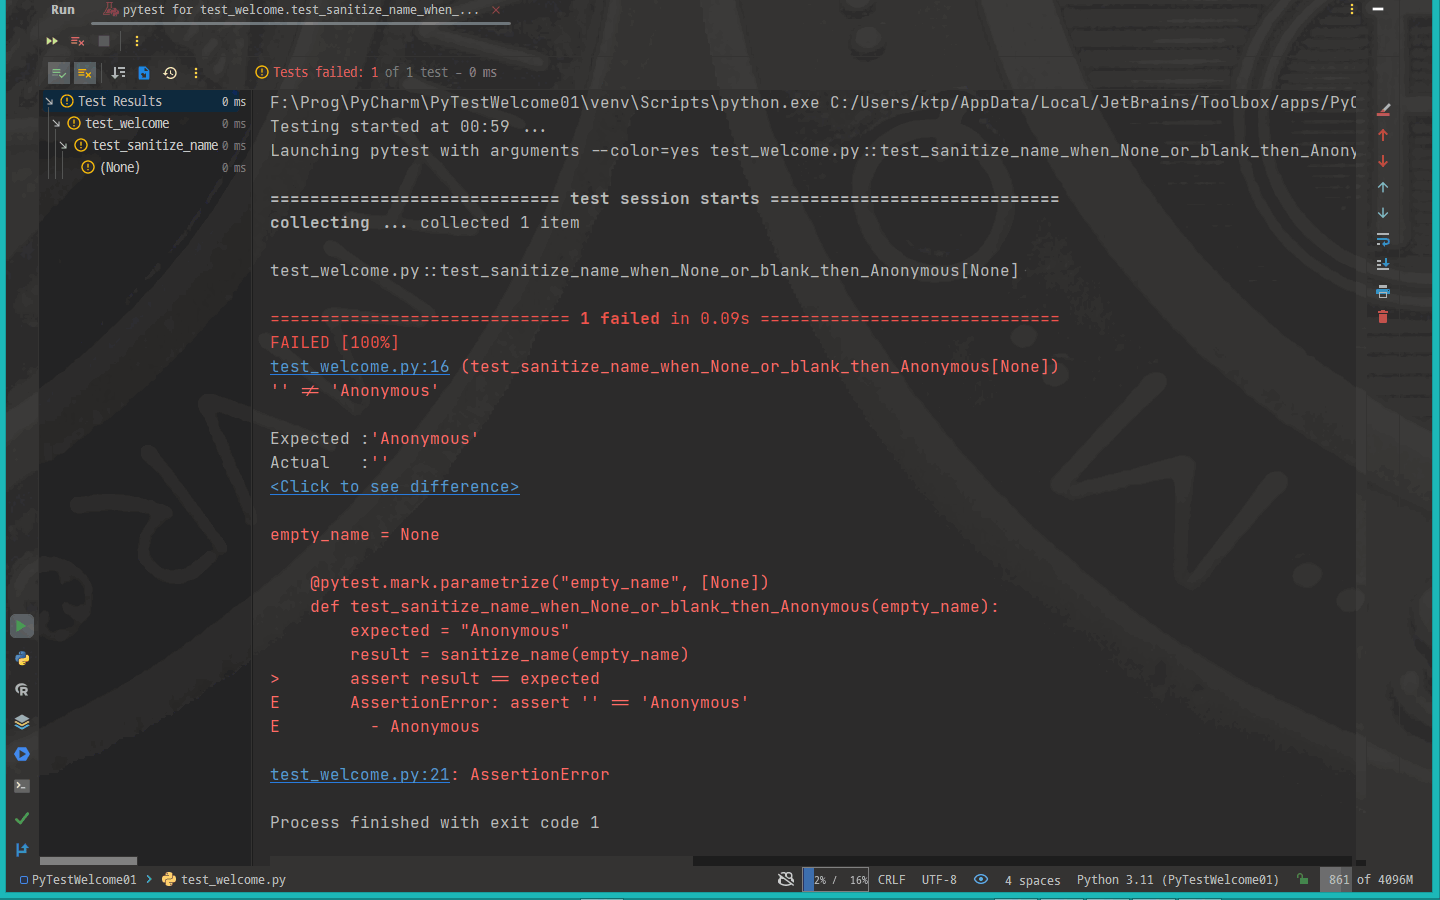
…we still get some error.
This time the situation is a bit different. We can see that the red -v flag (the indicator of the exact error placement) has moved from the line with the call to the sanitize_name function and points at the line of code with the assertion check.
That means the call to the tested function didn’t raise any exceptions. We didn’t get any null pointer exception, attribute Error, or runtime exception. But the returned value differed; the expected returned value was Anonymous, and we got an empty string.
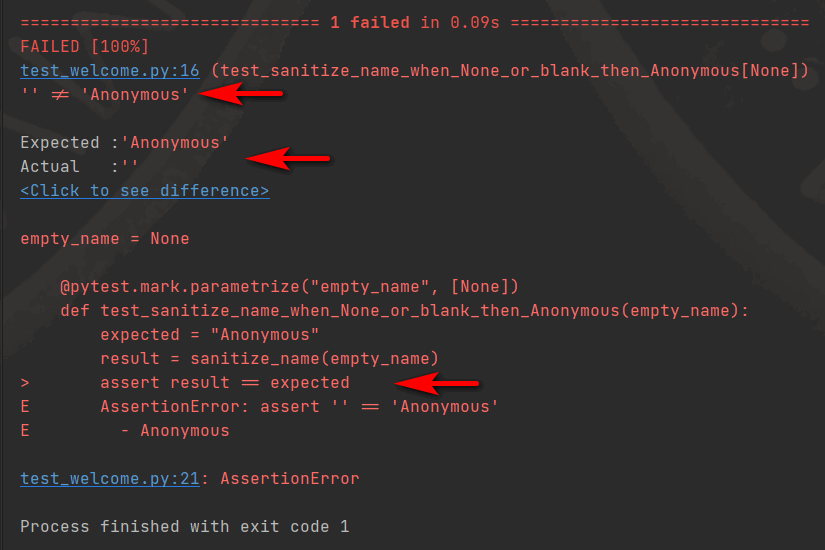
The problem is that the value returned by the tested function does not match the expected return value. To fix it, make the tested function handle this test case according to the requirements.
The improved version of the sanitize_name function may look like that:
Finally, all the tests are green.

For the second function, we can simply add more parameters of similar shape to the None argument, let’s say: \0\a\b\u007f – the null character, bell, backspace, and delete. Generally speaking, non-printable characters without any name between them, like that:
This time, when we run the test, we get:

The test is red. This test case was a bit tricky. The characters passed as an argument to the test function are not whitespace characters in the strict sense. They are the ASCII Control Characters, and the usual string strip method can't handle them. To deal with such characters, use isspace or isprintable methods. So, let’s modify the tested function once more:
There are many ways to handle the control characters: regular expressions, the replace method, and so on. We use the Python list comprehension feature and join the resulting list to the string.
We'll rerun the tests, and all tests pass green
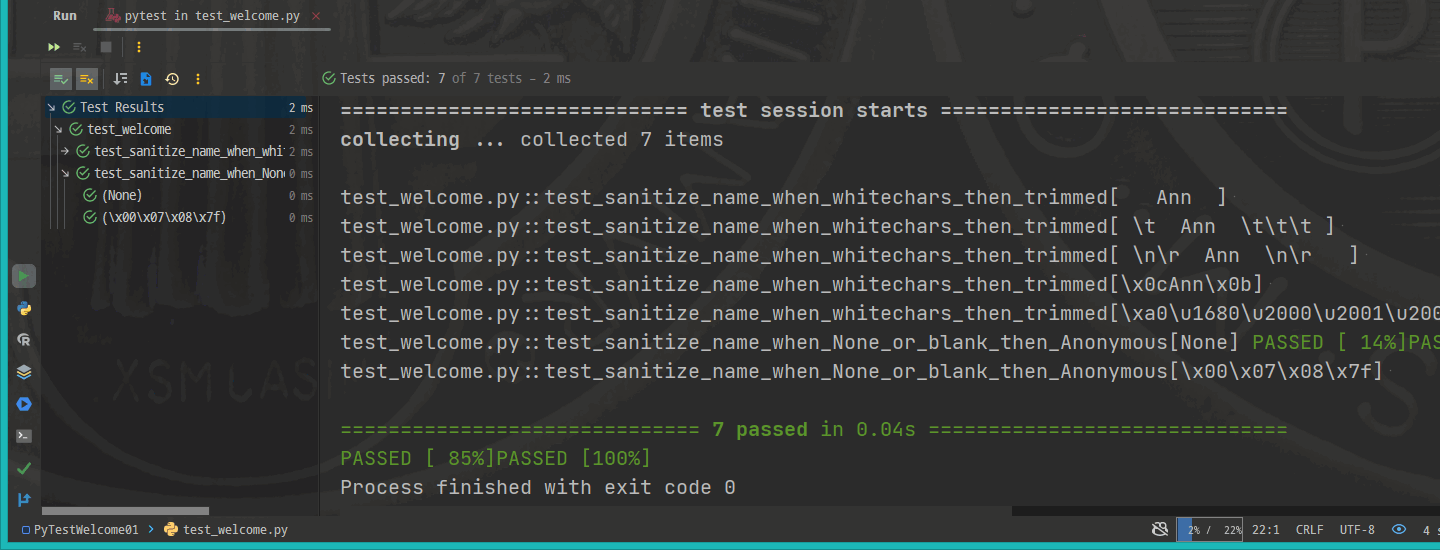
Part #3 Summary
We have faced many challenges while attempting to sanitize usernames, which seemed simple. However, we have not yet met all of the requirements. We are beginning our testing journey with the Pytest library and PyCharm IDE. It is important to understand fixture functions, when exceptions should be thrown, and how to mock API calls. It was just a basic introduction to unit testing with Pytest and PyCharm. For more information, please refer to the official Pytest and PyCharm documentation. Thank you for reading, and good luck with your unit testing!
Further reading and resources
PyCharm documentation:
- Create and run your first Python project:
https://www.jetbrains.com/help/pycharm/creating-and-running-your-first-python-project.html - Test your first Python application:
https://www.jetbrains.com/help/pycharm/testing-your-first-python-application.html - Test your applications with PyCharm:
https://www.jetbrains.com/help/pycharm/testing.html - Rename Refactorings – Rename a Directory or a Unittest Module:
https://www.jetbrains.com/help/pycharm/rename-refactorings.html#f085fdd3 - Rename Dialog for a File:
https://www.jetbrains.com/help/pycharm/rename-dialog-for-a-file.html
Hyperskill topics:
- PyCharm basics:
https://hyperskill.org/learn/step/6193 - Running Python applications in PyCharm:
https://hyperskill.org/learn/step/19153 - Debugging Python applications in PyCharm:
https://hyperskill.org/learn/step/19163 - Design principles:
https://hyperskill.org/learn/step/8956 - Single Responsibility Principle:
https://hyperskill.org/learn/step/8963
The PyTest library Documentation:
- Conventions for Python Test Discovery:
https://docs.pytest.org/en/7.3.x/explanation/goodpractices.html#test-discovery - Parametrizing test functions
https://docs.pytest.org/en/7.1.x/how-to/parametrize.html?highlight=mark%20parametrize#pytest-mark-parametrize-parametrizing-test-functions
Other Documentation:
- Single-responsibility principle on Wikipedia:
https://en.wikipedia.org/wiki/Single-responsibility_principle - How to Write Beautiful Python Code with PEP8:
https://realpython.com/python-pep8/ - Using Given-When-Then to Discover and Validate Requirements:
https://www.ebgconsulting.com/blog/using-given-when-then-to-discover-and-validate-requirements-2/ - Python string isspace() function – with examples of Unicode characters treated as white chars in Python: https://www.toppr.com/guides/python-guide/references/methods-and-functions/methods/string/isspace/python-string-isspace/
like this

