Getting Started with Tkinter
Do you want to make desktop apps with Python? If yes, you may have felt lost by the many GUI (graphical user interface) libraries you can use. Maybe you have tried TUIs (text-based user interfaces), as I talked about in my previous article, but found the change to a GUI somewhat hard. You are not alone in this position. Many programmers have trouble picking the best tool for their GUI needs, often giving up on some things or choosing the most common one.
The many libraries, some with insane amounts of features, can be scary. Numerous libraries get more complicated to stay ahead, making a steep learning curve that can make even the most excited developer lose their hope. What should be a fun and good GUI creation process becomes a frustrating problem at the very beginning of the journey.
But what if there was a way to easily go through the mess of GUI development, without losing functionality and making hard decisions, with flexibility? Well, here is one — Tkinter, the built-in GUI standard library for Python, gives you a simple and easy way to build nice interfaces for your apps.
In this article, I will keep exploring standard Python libraries. So, let's say hello to Tkinter, our next mysterious thing to learn. I will show you the things Tkinter can do and guide you on the path of creating your own simple GUIs with confidence and passion. We will look at the main parts of Tkinter, like entry widgets, geometry managers, event objects, and bindings, giving you the important skills and knowledge to make your Tkinter app ideas come true. Whether you are a beginner or an expert, this article will make your Python GUI development skills better. So, hop in and let's get started!
Initiating Tkinter
Are you ready to have some fun creating your first app? Before we get started, let's make sure that you have everything you need to run it and use it without any issue. Tkinter is a built-in Python standard library, so you don't have to download anything extra. You just need to do these two easy steps:
— Make sure that you have Python installed, if not, go to https://www.python.org/downloads/ download and install it from there.
— Open your terminal and type python -m tkinter.
If all is good, you should see a little window pop up, confirming that Tkinter is ready to go.
Awesome! You're now all set to import and use Tkinter in your Python projects.
To import Tkinter, you can use its common alias:
With this one line of code, you've unlocked the power of Tkinter, which lets you create spectacular and interactive desktop applications. Now that you have the tools, let's go on to the next part of our journey, where we'll explore the wonderful world of building your first Tkinter application!
Let's Dive into the Building Blocks
Congratulations! You've just unlocked the power of Tkinter, and now you're all set to explore it. In this section, we'll dive into the basic building blocks of Tkinter and how they mesh. You'll get to see how classic widgets, geometry managers, event objects, bindings, and the event loop can help you make the app of your dreams!
Widgets: The Building Blocks of Your UI
Imagine your app as a blank canvas that you can paint however you want. Widgets are the heart and soul of Tkinter, to put it more formally, the core concept of it. With them, you can transform a blank canvas into a beautiful masterpiece. Each widget type has a unique function and style. You've got clickable button widgets for actions, labels for display, text boxes for input, checkboxes for selections, and so much more! Tkinter gives you a rich collection of widgets to satisfy your needs.
Frames: If you have a lot to display, you might want to categorize or simply organize related items into container widgets, known as frames. Frames are incredibly flexible and customizable. You can nest other widgets inside them, allowing you to manage your desired layout in a straightforward manner. You can tweak their size, color, border, and padding. Padding is the space between the frame and its contents. You also have the freedom to arrange the items inside the frame, whether by stacking, gridding, or placing them randomly.
Buttons: Who doesn't love buttons? We constantly click them to trigger actions. For instance, a “Submit” button for sending your data or a “Play” button for starting your music or videos.
Label widgets: These widgets that display text, images, or icons. For example, labels for items, titles, or value displays. Want to ensure that the user knows what they can do? Slap on a label.
Let's look at some code:
As you can see, creating a frame (tk.Frame), a label (tk.Label), a button (tk.Button) is simple and straightforward.
Note: Concepts of geometry managers and mainloop are not discussed yet, but you already observe that you can't survive without these.
Note: I will not discuss properties for each object. It can take hours. You are welcome to read any other external documentation for that.
And this is how it looks:

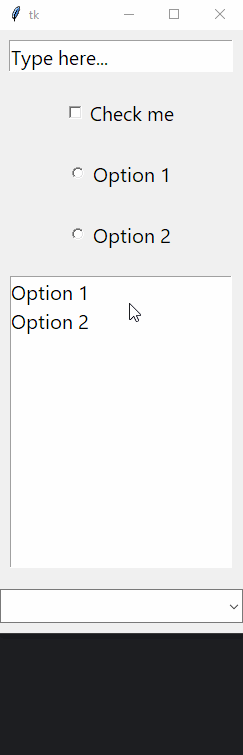
Input Widgets. These are where you type text. For example, text boxes, password fields, search bars, and so on.
Checkboxes and Radiobuttons: These let you pick options. Checkboxes allow multiple selections, while radio buttons permit only one. For example, checkboxes for setting your preferences or a to-do list. Radio buttons for choosing a unique option, like the unique answer to a test.
Listboxes and Comboboxes: These display lists of options. For example, listboxes for file selection or comboboxes for picking items from a dropdown menu.
Remember, this isn't an exhaustive list of types of widgets. You can discover more by browsing the documentation. And please keep in mind, each widget has its properties like size, color, and font, allowing you to customize your app and make it look fantastic.
As with frames, we just pick the correct object that has an intuitive name, and glue it with a geometry manager.
Here is the code that you can try to play around:
Here is how it looks like:
Geometry Managers: Organizing Your Elements
It's time for geometry managers. Currently, you already saw them in the previous code, and you have a small but decent understanding of their purpose. They're the ones that determine where your widgets go and their dimensions. They ensure your app looks great and user-friendly (without them, you can't even see anything!).
Let's take a look at them.
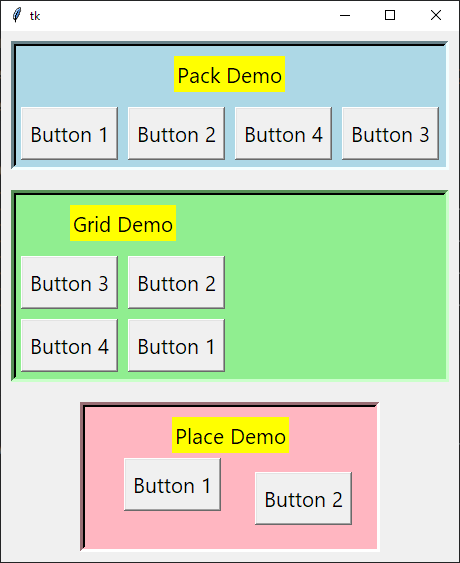
Pack: We were using this before. This type is used for packing your widgets in boxes and stacking them up. It's simple and quick for basic, but not very flexible for complex layouts.
Grid: This is like arranging your widgets in a grid layout with rows and columns. It's excellent for structured layouts or neat alignments.
Place: This is like positioning your widgets wherever you want with precise coordinates. It gives you the most control, but requires careful planning.
The perfect and powerful geometry manager for you depends on your desired layout and the level of control you need. Don't think you can skip this step and just wing it. With geometry managers, you need to link your widgets to your canvas.
Here is how you can use it in the code:
This is the result:
Events: Making Your App Interactive
Your app isn't just a static mess; it's a dynamic piece of art that responds to user actions. Events are the commands that the user sends to your app, like clicking a left mouse button or pressing a key. Tkinter keeps an ear out for these events and lets you decide how your app should react.
Button Clicks: These happen when the user clicks a button to trigger an action. For example, clicking the “Submit” button to send your data or the “Play” button to start your music or a video.
Text Input: These occur when the user inputs (types) text into a widget. For example, typing your name into a text box or your password into a password field.
Mouse Movements: These are when the user moves the mouse over a widget. For example, changing the color of a button when the mouse hovers over it or displaying a tooltip when the mouse lingers on it.
By defining event handlers, you make your app more user-friendly and interactive.
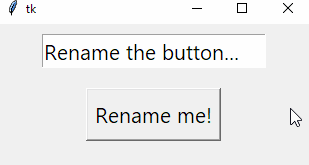
Bindings: Linking Events to Actions
So, how do you get these events to trigger actions in your code? That's right, you use bindings! Bindings are the glue that connects events to the code that handles them. It's not as hard as it might sound, you simply define a function and set it up where you need it.
Binding Functions to Events: This is like instructing your app on what to do when an event occurs. For example, binding a function to a button click event, so the function executes when the button is clicked.
Customizing Event Responses: This is like giving your app different responses for different event types on the same widget, making it more flexible and fun. Did the user press the button labeled 1, 2, or 3? Make sure to choose the correct response for that. Nobody wants the app to close when they press the combination of keys and expect to save their current work.
Bindings allow you to create astonishing features based on user interactions, making your app a powerful tool. And remember, this might sound intimidating, but it's not harder than any other non GUI app you have written. Just a different API with unique abilities! Don't sweat it!
Let's take a look at the example:
We use the bind method to bind something. The name of the event (e.g., '<Enter>') and then binding it to a function that we made for this event. We also provide our “command” for a button.
It's not difficult to understand that all these actions happen by altering the internal config of the object.
Here is the result:
This is just a taste of the vast possibilities that Tkinter's core concepts can offer. With a bit of practice and curiosity, you'll be a master of these tools in a reasonable amount of time! Crafting beautiful and useful desktop apps that bring joy not only to your users but to you as well.
Pick at properties
Let's make a little exception and describe a few properties, so we have a better picture of that stuff we did before.
One of the key features of Tkinter is its ability to customize widgets to suit your needs. This part will talk through the process of customizing widget appearance and behavior in Tkinter. So, let's take a look at the possibilities that Tkinter can offer.
Colors and Fonts
You can change the color of a widget by using the bg (background) and fg (foreground) options. Here's an example:
In this example, the button's background color is red, and the text color is white.
You can also customize the font of the label widget text using the font option:
In this example, the label's font is set to Helvetica and the font size to 16.
Size and Position
The size of a widget can be controlled using the width and height options. The position of a widget can be controlled using the grid system or pack method.
State
You can enable or disable a widget using the state option. A disabled widget will not respond to user interactions:
In this example, the button is disabled and will not respond to click events.
Customizing the appearance and behavior of widgets in Tkinter allows you to create a unique and interactive user interface for your Python applications. With the options provided by Tkinter, you can control every aspect of your widgets, from their color and minimum size to their behavior and response to user interactions.
Advanced topics
Let's take a brief look at some advanced topics.
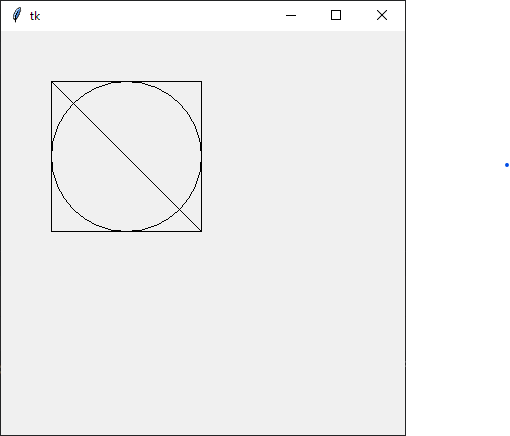
Canvas: Beside our poetic and artful thinking before, tkinter provides us with the Canvas widget. The Canvas widget is one of the most powerful and flexible widgets in Tkinter. It allows you to create complex GUIs and is used to draw shapes, such as lines, ovals, polygons, and rectangles, in your application. You can also use it to display images or text.
Let's draw some shapes:
Here is how it looks like:
Menus: Menus are an integral part of any robust GUI application window. They provide a way to organize commands and features in a hierarchical manner, making it easier for users to navigate through the application.
Here's a basic example of how to create a menu:
Here is how it looks like:

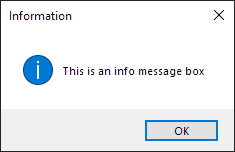
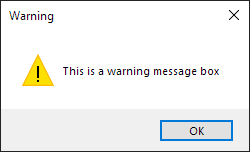
Dialog boxes: the thing that most users hate because in practice it means that something bad happened.
Here is how they look like:

The 'question' type dialog also exists and is not that annoying. It may be useful, if you want to make sure the user agrees to something.
In addition to advanced features, one may find it useful with the combination of other libraries.
PIL: It's all about Images, and you know what? Tkinter can handle them. How about combining this and making your own app?
Matplotlib: Are you into stats and want to visualize your insights? Don't be shy, you can embed Matplotlib plots in your Tkinter applications.
NumPy and SciPy: How about making your static jupyter notebooks more interactive and push them into masses. Tkinter will help you to organize your scientific presentation.
SQLite: Fear not, by combining tkinter and SQLite, you will make the database reader you always wanted.
Remember, one of the strengths of Python is its rich ecosystem of libraries. Don't be afraid to explore these libraries and see how they can enhance your Tkinter applications.
Conclusion
Let’s wrap up. We've covered the basics of Tkinter, a powerful Python code library for creating real-world applications. We've explored its fundamental concepts, including widgets, geometry managers, and event handling. We've also delved into more advanced topics such as widgets behavior. At the end, we took a little peek at the widget appearance.
If you're interested in learning more about tkinter, here are some recommendations:
— Official Tkinter Documentation: This is the most authoritative source of information on Tkinter for Python. It provides a comprehensive overview of the cide library's classes, methods, and options. It’s not a beginner-friendly reading.
— Online Tutorials: Some websites have good tutorials on Tkinter. These tutorials provide step-by-step instructions and examples, making it easy for beginners to learn at their pace.
— Books: Python GUI programming with Tkinter by Alan D. Moore is the book I can recommend. It offers a deep dive into Tkinter, with practical examples and best practices.
— Courses: How about a good video course on YouTube? https://www.youtube.com/watch?v=mop6g-c5HEY This course has 18.5 hours worth of content. Step by step implementation and numerous projects. Well-designed code and intuitive approach for problem-solving.
As you might have noticed, this course is 18.5 hours long, the book is 700 pages long. That's a lot of time to master this craft. This makes the final and the most crucial idea of the best way to learn — do stuff. I encourage you to experiment with Tkinter, try out different widgets and options, and create your own applications. Remember, the key to mastering any programming library is consistent practice and curiosity
like this
Create a free account to access the full topic

