Table of contents
Text Link
Text Link

Beginners Guide to REST API Testing

This article will detail how to write REST API Test Automation in Java. First, let's explain the term. REST is an acronym for REpresentational State Transfer and is a set of rules and conventions that allow different software applications to communicate and exchange data over the Internet. REST provides interaction between the user (for example, web browser or mobile app) and the server (where data is stored) in a standardized way.

For this article, we will use RESTful API.

You can find the complete documentation on the page above. You can also try to copy the request CURL and import it to the Postman application. This application helps execute REST API development requests in Java. This would help you understand which requests we have executed during automation testing.

The mentioned Java API supports five common types of requests:

  • GET helps you get information about one or more elements. We also have the GetBookingIds request, which produces filtered booking IDs. Another example is GetBooking, which returns a booking with the specified ID.
  • POST creates a new element. In the example API, we have a CreateBooking request, which creates a new booking.
  • PUT updates an element. One example is an UpdateBooking request. It updates a specified booking, but we must add all booking attributes in the body.
  • PATCH updates a part of the element. In the example API, a PartialUpdateBooking request allows us to update only part of the booking's attribute. We are mentioning only attributes that we want to change.
  • DELETE allows us to delete the element. A DeleteBooking request deletes a booking with a specified ID.

It is crucial to ensure the correct proportion of test types when testing. Automated API tests are faster and more stable than automated GUI tests. That's why REST API testing should be more than GUI tests.


 testing pyramid
Source - thoughtworks.com

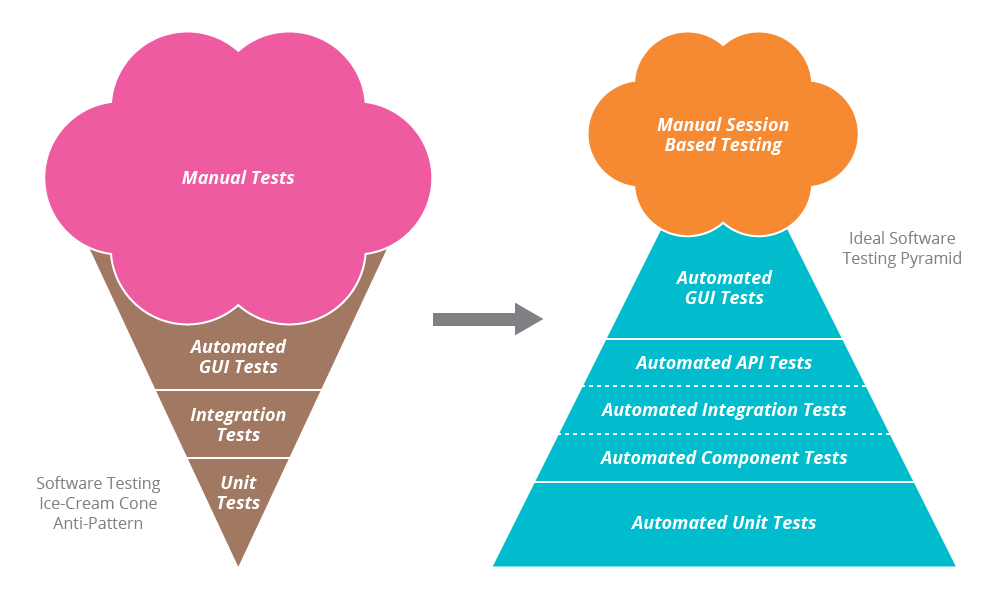
We should follow the testing pyramid to avoid the ice cream cone antipattern. UI tests can generate test data before running UI tests.

Popular libraries for testing

Let's focus on libraries that we would need for our tests. I would also add libraries, which wouldn't be necessary, but they would help us.

Let's start with JUnit. It is an open-source framework for unit tests in Java.

Firstly, we must use the Rest Assured Library to execute API requests and check their returns. This library will also enable us to make assertions and have more readable assertions, such as fluent assertions. For more complex assertions involving arrays, custom objects, and more, we can use AssertJ. Additionally, we will utilize annotations from JUnit 5 in this article, as there are different annotations between JUnit 4 and JUnit 5.

During API tests, you must serialize POJO (Plain Old Java Object) into JSON and vice versa (deserialize). Jackson API would help a lot in this case. We would also use Lombok not to write every getter and setter.

Another case is test data. You can use libraries to generate test addresses, names, and more. In this article, we will use JavaFaker.

Also, you can create mocks and stubs to simulate answers for some requests. Popular mocking frameworks are Mockito and EasyMock. Using mocking helps your REST API testing behavior without depending on the external REST services, making the tests more reliable and repeatable.

Helpful JUnit annotations

There are helpful annotations in JUnit that would help you organize tests. We will shortly describe part of them. Keep in mind that we are not referring to all of them. Let's be selective in our discussion.

@Test

Thanks to this annotation, a method is recognized as a test. Remember that this method shouldn't be private. Also, it is recommended to be void because returned values would be ignored.

@BeforeEach @AfterEach

Those annotations before methods would run part of the code before or after every test. This could be used to set up test data updated during tests. In JUnit 4, we had @Before and @After.

@BeforeAll @AfterAll

Thanks to the mentioned annotations, you would run a method only once before or after all tests in the class. Previously, in JUnit 4, we had @BeforeClass and @AfterClass.

@Nested

This would help you use a class with tests inside the tests class. You have to add this annotation before the nested class

@Disable

You can turn off a test class or a test method. Previously, you had @Ignore annotation. If you want to disable a test under specified conditions, you must use an assumption.
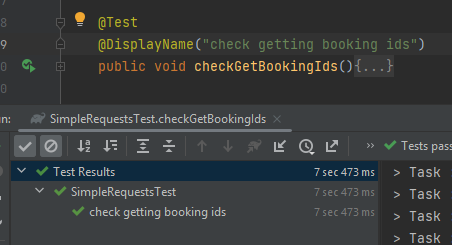
@DisplayName

You can have a custom display test name other than the method name.
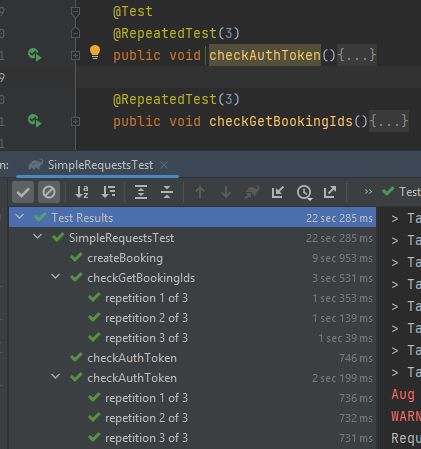
@RepeatedTest

Thanks to this annotation, you can repeat tests. Just remember not to use @Test annotation in this situation if you don't want to have an extra run.

Simple requests

Let's start with a simple request. We want to make a Get method to check if the API is responding.

@Test
    public void checkApiStatus(){
       given().
                baseUri("https://restful-booker.herokuapp.com").
                contentType("application/json").
       when().
                get("/booking").
       then().
                assertThat().statusCode(200);
    }

Let's go through the used keywords.

  • given() describes the initial condition for our request. In our example, we have a base URI and content type. We can also specify headers, path parameters, and request body.
  • when() describes a type of request and used endpoint.
  • then() describes how we want to validate a request result. In the example, we check the result code, which is expected to be 200. However, we can also check the whole result, like body, cookies, response headers, etc.

Let's make a post request.

@Test
    public void checkAuthToken(){
        String payload = """
                {
                    "username" : "admin",
                    "password" : "password123"
                }""";
        Response response =  given().
                baseUri("https://restful-booker.herokuapp.com").
                body(payload).
                contentType("application/json").
        when().post("/auth").
        then().
                log().all().
                extract().response();-
        var token = response.jsonPath().getString("token");
        assertThat(token).isNotEmpty();

    }

In this example, we generate a token that can be useful in handling post, update, and delete requests. As you can see, the test has a pre-defined body. We extract the token and assign it to the token variable. We then use an assertion from AssertJ to verify that the token is not empty. This token can be used in other requests. However, it is important to note that this is just a simple example. In reality, it is not recommended to store passwords in the code. Instead, they should be stored in a separate file for security reasons.

You can also get a list from the response body. The next test would execute another GET request, returning a list of IDs.

@Test
    public void checkGetBookingIds(){
        List *Integer* responseList = given().
                baseUri("https://restful-booker.herokuapp.com").
                contentType("application/json").
        when().get("/booking").
                then().
                extract().
                response().jsonPath().getList("bookingid");
        var sth = responseList;
        assertThat(responseList).isNotEmpty();
    }

Our response object is a list of elements with the "bookingId" attribute. This is an example answer:

[
    {
        "bookingid": 2274
    },
    {
        "bookingid": 3860
    },
    {
        "bookingid": 4319
    }
]

We've extracted the attribute's value in the test and saved it to the list. Thanks to the AssertJ method, we have checked if the list is empty. You can also use an assert method from Hamcrest.

Serializing and deserializing (POJO and JSON object)

Sometimes, we want to convert JSON into a simple Java object POJO.

Making use of Jackson libraries can prove to be advantageous in that particular scenario. The main library is Jackson Core. In our following example, we will use the Jackson Datatype: Joda. This client library would help us to get data variables.

We want to test the GET method, which is returning a booking.

This is an example API result.

{
    "firstname": "Josh",
    "lastname": "Allen",
    "totalprice": 111,
    "depositpaid": true,
    "bookingdates": {
        "checkin": "2018-01-01",
        "checkout": "2019-01-01"
    },
    "additionalneeds": "super bowls"
}

We need to create the Booking and the BookingDates classes.

BookingDates:

public class BookingDates {
    @JsonFormat(shape = JsonFormat.Shape.STRING, pattern = "yyyy-MM-dd")
    @JsonProperty("checkin")
    private Date checkIn;

    @JsonFormat(shape = JsonFormat.Shape.STRING, pattern = "yyyy-MM-dd")
    @JsonProperty("checkout")
    private Date checkOut;

    public BookingDates(Date checkIn, Date checkOut) {
        this.checkIn = checkIn;
        this.checkOut = checkOut;
    }


    public Date getCheckIn() {
        return checkIn;
    }

    public void setCheckIn(Date checkIn) {
        this.checkIn = checkIn;
    }

    public Date getCheckOut() {
        return checkOut;
    }

    public void setCheckOut(Date checkOut) {
        this.checkOut = checkOut;
    }
}

This is a model for bookingdate. As you can see, we have used an annotation called JsonProperty. It helps us to have a JSON attribute name different from the variable name. Thanks to JsonFormat, we can have a Date variable in POJO.

Booking:

public class Booking {
    private String firstname;
    private String lastname;
    private int totalprice;
    private boolean depositpaid;
    private BookingDates bookingdates;
    private String additionalneeds;

    public String getFirstname() {
        return firstname;
    }

    public void setFirstname(String firstname) {
        this.firstname = firstname;
    }

    public String getLastname() {
        return lastname;
    }

    public void setLastname(String lastname) {
        this.lastname = lastname;
    }

    public int getTotalprice() {
        return totalprice;
    }

    public void setTotalprice(int totalprice) {
        this.totalprice = totalprice;
    }

    public boolean isDepositpaid() {
        return depositpaid;
    }

    public void setDepositpaid(boolean depositpaid) {
        this.depositpaid = depositpaid;
    }

    public BookingDates getBookingdates() {
        return bookingdates;
    }

    public void setBookingdates(BookingDates bookingdates) {
        this.bookingdates = bookingdates;
    }

    public String getAdditionalneeds() {
        return additionalneeds;
    }

    public void setAdditionalneeds(String additionalneeds) {
        this.additionalneeds = additionalneeds;
    }
}

This is a model used for booking entry. In this scenario, there is no need for any annotations. Both classes contain public getters and setters, essential for serialization and deserialization. Although the IDE may suggest that the REST methods are not used, this is incorrect. Getters and setters are critical to the process of serialization and deserialization.

Now, we can execute the request, deserialize the result into a POJO, and implement a request method to retrieve an ID.

private int getFirstBookingId() {
        return given().
                baseUri("https://restful-booker.herokuapp.com").
                contentType("application/json").
        when().get("/booking").
                then().
                extract().
                response().path("bookingid[0]");
    }

    @Test
    public void getBookingDetails(){
        int bookingId = getFirstBookingId();
        Booking response = given().
                baseUri("https://restful-booker.herokuapp.com").
                contentType("application/json").
        when().
                get("/booking/" + bookingId).
        then().
                log().all().extract().response().as(Booking.class);
        assertThat(response).isNotNull();
    }

We can also serialize POJO into JSON. We need it in a POST request to create a new booking, so we must update the Booking class.

import com.fasterxml.jackson.annotation.JsonInclude;
import com.github.javafaker.Faker;

import java.util.Date;

public class Booking {

    private String firstname;
    private String lastname;
    private int totalprice;
    private boolean depositpaid;
    private BookingDates bookingdates;
    private String additionalneeds;

    public Booking() {
    }

    public Booking(BookingBuilder bookingBuilder) {
        this.firstname = bookingBuilder.firstname;
        this.lastname = bookingBuilder.lastname;
        this.totalprice = bookingBuilder.totalprice;
        this.depositpaid = bookingBuilder.depositpaid;
        this.bookingdates = bookingBuilder.bookingdates;
        this.additionalneeds = bookingBuilder.additionalneeds;
    }


    public String getFirstname() {
        return firstname;
    }

    public void setFirstname(String firstname) {
        this.firstname = firstname;
    }

    public String getLastname() {
        return lastname;
    }

    public void setLastname(String lastname) {
        this.lastname = lastname;
    }

    public int getTotalprice() {
        return totalprice;
    }

    public void setTotalprice(int totalprice) {
        this.totalprice = totalprice;
    }

    public boolean isDepositpaid() {
        return depositpaid;
    }

    public void setDepositpaid(boolean depositpaid) {
        this.depositpaid = depositpaid;
    }

    public BookingDates getBookingdates() {
        return bookingdates;
    }

    public void setBookingdates(BookingDates bookingdates) {
        this.bookingdates = bookingdates;
    }

    public String getAdditionalneeds() {
        return additionalneeds;
    }

    public void setAdditionalneeds(String additionalneeds) {
        this.additionalneeds = additionalneeds;
    }

    public static class BookingBuilder {

        private static Faker faker = new Faker();
        private String firstname = faker.name().firstName();
        private String lastname = faker.name().lastName();
        private int totalprice = 1000;
        private boolean depositpaid = false;
        private BookingDates bookingdates;
        private String additionalneeds;

        public BookingBuilder withFirstName(String firstname) {
            this.firstname = firstname;
            return this;
        }

        public BookingBuilder withLastName(String lastname) {
            this.lastname = lastname;
            return this;
        }

        public BookingBuilder withTotalprice(int totalprice) {
            this.totalprice = totalprice;
            return this;
        }

        public BookingBuilder withDepositpaid() {
            this.depositpaid = true;
            return this;
        }

        public BookingBuilder withBookingdates(Date checkin, Date checkout) {
            this.bookingdates = new BookingDates(checkin, checkout);
            return this;
        }

        public BookingBuilder withAdditionalneeds(String additionalneeds) {
            this.additionalneeds = additionalneeds;
            return this;
        }

        public Booking build() {
            return new Booking(this);
        }
    }

}

We don't want to create a Booking instant with a constructor with many parameters. That's why we have implemented a design pattern called builder. As you can see, the builder has methods like "withFirstName" to specify a value for attributes. Ultimately, we use the "build" method to create an instance of Booking with the builder's data. We still want to be able to deserialize; that's why we had to add a constructor without a parameter. Also, we want to have some test data, so we have used the JavaFaker library. Let's implement a test and use the updated class.

@Test
public void createBooking() {
        Booking booking = new Booking.BookingBuilder()
                .withDepositpaid()
                .withBookingdates(
                      new Date(2024, 01, 15), new Date(2024, 01, 30))
                .withAdditionalneeds("early check in").build();
        int bookingId = given().
                baseUri("https://restful-booker.herokuapp.com").
                contentType("application/json").
                body(booking).
        when().
                post("/booking").
        then().
                log().all().
                extract().response().jsonPath().getInt("bookingid");
        assertThat(bookingId).isGreaterThan(0);
}

During the test, we made an instant booking using the default values and modified only some attributes. We then retrieved the booking ID from the response code. You can also verify other aspects, such as ensuring that the values of a created booking match the expected values.

Share this article
Get more articles
like this
Thank you! Your submission has been received!
Oops! Something went wrong.

Lombok

As you can see, we had to write many code in the Booking and BookingDates classes. However, using the Lombok library can significantly reduce the number of code lines. Let's take a look at the updated BookingDates class.

@Data
public class BookingDates {
    @JsonFormat(shape = JsonFormat.Shape.STRING, pattern = "yyyy-MM-dd")
    @JsonProperty("checkin")
    private Date checkIn;

    @JsonFormat(shape = JsonFormat.Shape.STRING, pattern = "yyyy-MM-dd")
    @JsonProperty("checkout")
    private Date checkOut;

    public BookingDates() {}

    public BookingDates(Date checkIn, Date checkOut) {
        this.checkIn = checkIn;
        this.checkOut = checkOut;
    }
}

Thanks to @Data annotation, we don't have to write getters and setters.

@Data
@Builder
@NoArgsConstructor
@AllArgsConstructor
public class Booking {

    private static Faker faker = new Faker();
    @Builder.Default
    private String firstname = faker.name().firstName();

    @Builder.Default
    private String lastname = faker.name().lastName();

    @Builder.Default
    private int totalprice = 1000;

    @Builder.Default
    private boolean depositpaid = false;

    @Builder.Default
    private BookingDates bookingdates = new BookingDates(
            new GregorianCalendar(2024, Calendar.JANUARY, 15).getTime(),
            new GregorianCalendar(2024, Calendar.JANUARY, 30).getTime());

    @Builder.Default
    private String additionalneeds = "N/A";
}

In Booking, we also don't have to write setters and getters. Also, we want to use extra annotation instead of a builder. In this situation, we use @Builder. There are also annotations for constructors, like @NoArgsConstructor and @AllArgsConstructor. We want to have the default data, so @Builder.Default will also be helpful. You can also still use your builder but need other annotations.

Now, look at the updated test with the default builder.

@Test
    public void createBooking() {
        var dates = new BookingDates(new GregorianCalendar(2024, Calendar.JANUARY, 15).getTime(),
                new GregorianCalendar(2024, Calendar.JANUARY, 30).getTime());
        Booking booking = Booking.builder()
                .depositpaid(true)
                .bookingdates(dates)
                .additionalneeds("early check in").build();
        int bookingId = given().
                baseUri("https://restful-booker.herokuapp.com").
                contentType("application/json").
                body(booking).log().all().
        when().
                post("/booking").
        then().
                log().all().
                extract().response().jsonPath().getInt("bookingid");
        assertThat(bookingId).isGreaterThan(0);
    }

As you can see, we have builder() and can set values with methods with property names.

To have suggestions from IDE, a plugin would be helpful. Also, for the gradle setup, let's look at the Lombok official page.

Authentication

There are many ways of authentication, for example, basic, digest, or oath2. In the example project, we have two possibilities. We can use basic authentication or a token in cookies for some methods.

    @Test
    public void patchBooking() {
        Booking booking = Booking.builder().build();
        int bookingId = getNewlyCreatedBook(booking);
        Booking exampleBookingData = Booking.builder().build();
        exampleBookingData.prepareData();

        Booking response = given().
                headers("Accept", "application/json").
                auth().preemptive().basic("admin", "password123").
                baseUri("https://restful-booker.herokuapp.com").
                contentType("application/json").
                body(exampleBookingData).log().all().
        when().
                patch("/booking/" + bookingId).
        then().
                log().all().extract().response().as(Booking.class);

        assertThat(response)
                .usingRecursiveComparison()
                .ignoringFields("bookingdates", "additionalneeds")
                .isEqualTo(exampleBookingData);
    }

As you can see, we used preemptive().basic() for primary authentication. We can get a token for the same credentials and add it to the cookies.

public String getToken(){
        String payload = """
                {
                    "username" : "admin",
                    "password" : "password123"
                }""";
        Response response =  given().
                baseUri("https://restful-booker.herokuapp.com").
                body(payload).
                contentType("application/json").
        when().post("/auth").
        then().
                log().all().
                extract().response();
        var token = response.jsonPath().getString("token");
        assertThat(token).isNotEmpty();
        return token;
    }

    @Test
    public void patchBookingWithToken() {
        var token = getToken();
        Booking booking = Booking.builder().build();
        int bookingId = getNewlyCreatedBook(booking);
        Booking exampleBookingData = Booking.builder().build();
        exampleBookingData.prepareData();

        Booking response = given().
                headers("Accept", "application/json").
                cookie("token", token).
                baseUri("https://restful-booker.herokuapp.com").
                contentType("application/json").
                body(exampleBookingData).log().all().
        when().
                pathParam("bookingId", bookingId).
                patch("/booking/{bookingId}").
                then().
                log().all().extract().response().as(Booking.class);

        assertThat(response)
                .usingRecursiveComparison()
                .ignoringFields("bookingdates", "additionalneeds")
                .isEqualTo(exampleBookingData);
    }

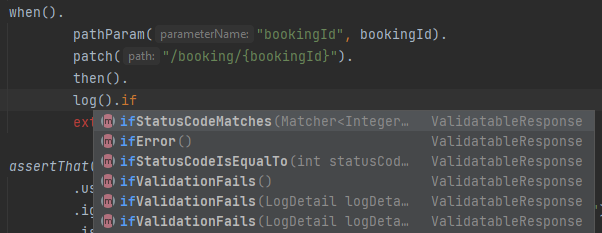
We have added tokens using the cookie() method. Also, you can notice that we have used pathParam() to add a variable to patch(). Also, you can notice that we have used a feature in assertJ. We are comparing two objects, but we want to ignore some fields because in exampleData we have only part of the booking's parameters that we wanted to update. Thanks to .usingRecursiveComparison().ignoringFields(), we could achieve it.

Logs

Logs are very easy to turn on. You can add it to each request or set it up globally. There are separate logs for sent requests and received answers. You should add a log method in a "given" or "then" section. You can log everything by adding the .log().all() method, the most popular option. However, you have different other options. You can log only a body, header, or cookies. You can also log in only under specified conditions. You have special methods for it. Here are the mentioned methods:


Assumptions

Sometimes, we want to abort tests under some conditions, for example, a chosen environment. In that situation, assumption would be very helpful. We have three methods: assumeTrue(), assumeFalse(), and assumingThat().

public class SimpleRequestsTest {

    private int statusApi;

    private int getApiStatus(){
        return given().
                baseUri("https://restful-booker.herokuapp.com").
                contentType("application/json").
                when().
                get("/booking").
                then().extract().statusCode();
    }

    @BeforeEach
    public void setUp() {
        statusApi = getApiStatus();
    }

    @Test
    public void checkAuthToken(){
        assumeTrue(statusApi == 200);
        String payload = """
                {
                    "username" : "admin",
                    "password" : "password123"
                }""";
        Response response =  given().
                baseUri("https://restful-booker.herokuapp.com").
                body(payload).
                contentType("application/json").
        when().post("/auth").
        then().
                log().all().
                extract().response();
        var token = response.jsonPath().getString("token");
        assertThat(token).isNotEmpty();
    }

    @Test
    public void checkGetBookingIds(){
        assumeFalse(statusApi == 200);
        List *Integer* responseList = given().
                baseUri("https://restful-booker.herokuapp.com").
                contentType("application/json").
        when().get("/booking").
                then().
                extract().
                response().jsonPath().getList("bookingid");
        assertThat(responseList).isNotEmpty();
    }
}

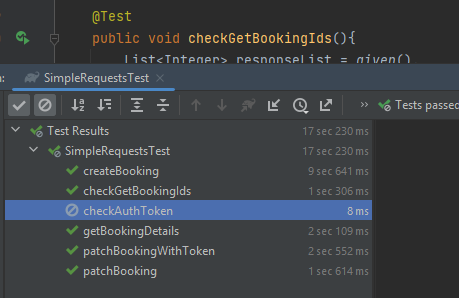
The example shows that we would disable the tests depending on the API status code. In checkAuthToken, we have assumeTrue(). That's why this test would run only if the status would be 200. On the other hand, checkGetBookingIds would be executed only if the status is different from 200. Let's check the results for the status 200.

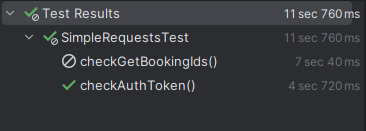
As you can see, one test passed, and another was aborted.

Now, let's look at the assmingThat() method.

assumingThat(env.equals("dev"),
                () ->  assertThat(getApiStatus()).isEqualTo(200));

In that case, we would check API status only on the dev environment.

Request builder

As you may have noticed, we have been setting request configuration in every test. That's against the rule DRY (Don't Repeat Yourself). Let's think about how to fix it.

public class SimpleRequestsTest {
private static RequestSpecification requestSpec;
    private static ResponseSpecification responseSpec;

    @BeforeAll
    public static void setUpSpec() {
        requestSpec = new RequestSpecBuilder()
                .setBaseUri("https://restful-booker.herokuapp.com")
                .setContentType(ContentType.JSON)
                .log(LogDetail.ALL)
                .build();

        responseSpec = new ResponseSpecBuilder()
                .expectStatusCode(200)
                .expectContentType(ContentType.JSON)
                .log(LogDetail.ALL)
                .build();
    }

    @Test
    public void checkAuthToken(){
        String payload = """
                {
                    "username" : "admin",
                    "password" : "password123"
                }""";
        Response response =  given().
                spec(requestSpec).
                body(payload).
        when().post("/auth").
        then().
                spec(responseSpec).
                extract().response();
        var token = response.jsonPath().getString("token");
        assertThat(token).isNotEmpty();
    }
}

As you may have noticed, we have created an instance of RequestSpecification and ResponseSpecification. We have set the base URI, content type, and logging level in the request specification. In the response specification, we have developed the level of logging, expected status code, and expected content type. The mentioned specifications we have to assign to the request by spec() method in the correct section. Thanks to this, we don't have to set requests from the beginning of every test.

Conclusion

The examples mentioned in the article show numerous features of the libraries. However, it is essential to note that this topic is complex, and the article does not cover all the possibilities and resources available. The examples provided are merely simple ones. In more complex integration test projects, you must consider its architectural style and ensure it adheres to clean code principles. Also, storing credentials in a secure and separate location would be best.

Related Hyperskill topics

Create a free account to access the full topic

Wide range of learning tracks for beginners and experienced developers
Study at your own pace with your personal study plan
Focus on practice and real-world experience
Andrei Maftei
It has all the necessary theory, lots of practice, and projects of different levels. I haven't skipped any of the 3000+ coding exercises.