A Hands-on Guide to Building Your First Decentralized Application
In the world dominated by Web3 and blockchain, there are many applications and use cases, from decentralized finance (DeFi) platforms to non-fungible tokens (NFTs). However, in this tutorial, we'll focus on the fundamental concept—creating a basic decentralized application (DApp) that allows potential users to save a piece of information, a string, in this case, on the blockchain. This DApp will be a practical introduction to blockchain development, giving you hands-on experience with essential tools and concepts.
By the end of this tutorial, you'll have a simple DApp where users can connect their MetaMask wallet, interact with a smart contract to save a string on the Sepolia testnet blockchain, and then retrieve that string. This process will introduce you to the core components of DApp development: frontend creation, smart contract development, and integrating the two.
While the application's functionality might seem basic, the principles you'll learn are foundational to more complex DApp development. Think of this as your first step into the exciting world of DApps!

What is a DApp?
A DApp, or De-centralized Application, is a software application that runs on a distributed computing system, most commonly the blockchain. Unlike traditional applications that run on centralized servers, DApps operates on a decentralized peer-to-peer network to resist censorship from central authorities and have no single point of failure. This decentralized nature is achieved through smart contracts, self-executing contracts with the terms of the agreement directly written into source code. Smart contracts replicate the logic of the DApps.
Prerequisites
Before diving into DApp, ensuring you have some foundational knowledge is essential. This will help you understand the steps we'll be taking and enable you to troubleshoot any issues that might arise.
Basic Web Development skills
- HTML (HyperText Markup Language): This is the standard markup language for documents designed to be displayed in a web browser. You should be familiar with creating basic structures using tags like <div>, <a>, and <input>.
- CSS (Cascading Style Sheets): CSS describes how HTML elements are displayed. A basic understanding of selectors, properties, and values will be beneficial. For instance, you should know how to set the background color of an element or style a button.
- JavaScript: As the scripting language that powers the dynamic aspects of web pages, a foundational knowledge of JavaScript is crucial. You should be comfortable with variables, functions, and event handling. For our DApp, JavaScript will play a pivotal role in connecting our front end to the blockchain.
Please note that this ‘vanilla’ approach is not used anymore. Developers use frameworks like Next.js for the front end, TailWind CSS for styling, and Hardhat for smart contract development. With that being said, in this tutorial, we demonstrate the ‘old school’ approach to give you a solid foundation so you can be comfortable moving to more advanced technologies.
Blockchain concepts
While not strictly necessary for this tutorial, a general understanding of blockchain concepts can provide valuable context. If you're new to decentralized blockchain, here are some key ideas to be aware of:
- Smart contracts: self-executing programs where the terms of agreement or conditions are written into lines of code. They run on the blockchain and are immutable once deployed unless designed using an upgradable pattern, but this is not our case.
- EVM (Ethereum Virtual Machine): The EVM is the runtime environment for smart contracts in Ethereum. It's a global, decentralized computer where each operation is replicated across thousands of nodes in the Ethereum network.
- EVM-compatible chains: These blockchains have been designed to be compatible with Ethereum's EVM. This means they can execute smart contracts and DApps developed for Ethereum without any or minimal modifications. Examples of EVM-compatible chains include Binance BNB Chain, Polygon, and Avalanche. The Sepolia testnet we'll be using is the Ethereum testnet designed to test DApps; it allows us to develop without spending real funds.
- MetaMask: This is a crypto wallet and gateway to blockchain Dapps. For our DApp, MetaMask will serve as the bridge between the user and the blockchain, allowing them to interact with our smart contract.
If you're unfamiliar with these concepts, don't worry! The tutorial is designed to guide you step by step. However, a bit of background reading can enhance your understanding and experience.
Tools and technologies
This tutorial leverages a combination of tools and technologies to build our DApp. Each plays a pivotal role in ensuring our DApps runs smoothly and interacts seamlessly with the blockchain.
Overview of key Tools:
- Ethers.js provides tools to interact with the Ethereum blockchain. It allows us to connect our front end to our smart contract, send transactions, and query the blockchain.
- Solidity is the language to write smart contracts for the Ethereum blockchain. It's statically typed, supports inheritance, and is designed to target the EVM.
- MetaMask is a crypto wallet and gateway to blockchain DApps. It's a browser extension that improves user experience via interacting with the DApps on the Ethereum blockchain, managing their accounts, and signing transactions.
- Sepolia testnet provides a testing environment similar to Ethereum but without real-world value. This allows DApp developers to test their DApps without spending real Ether.
- Remix IDE is an open-source web and desktop application that helps in smart contract development, written in Solidity language for the Ethereum blockchain. It provides features like testing, debugging, and deploying smart contracts and has a built-in static analysis module to identify vulnerabilities. This tutorial uses the Remix IDE to deploy the smart contract to the Sepolia testnet.
Setting up the development environment:
Installing Node.js
- Node.js is a runtime environment that lets us run JavaScript code server-side. It's essential for our development central server.
- Download Node.js and follow the installation instructions for your operating system.
Check out Web3 Node.js: From zero to a full-fledged project to learn more about establishing a Web3 Node.js project
Installing lite-server:
Once Node.js is installed, we can use its package manager, npm, to install other tools.
Open a terminal or command prompt and run the following command to install lite-server globally:
This lightweight development server serves our web page. It reloads it live as we make changes.
Get a Sepolia RPC node with Chainstack
An RPC node allows you to communicate with a blockchain and set up a Sepolia node using Chainstack; this node will be used in your MetaMask wallet.
Chainstack provides unified access to multichain node and data APIs, distributed compute and storage space, identity management and security testing, and the ever-expanding list of services and tools to build amazing DApps across all prominent Web3 protocols.
Setting Up MetaMask with the Sepolia testnet:
- If you haven't already, install the MetaMask extension for your browser.
- Open MetaMask and set it up with a new or existing Ethereum account.
- To connect to the Sepolia testnet, click the network dropdown menu (usually set to Ethereum Mainnet by default) at the top of the MetaMask window.
- Select Custom RPC and enter the details for the Sepolia testnet.
- Network name: Sepolia Chainstack
- New RPC URL: The HTTPS URL you find in your Chainstack console
- Chain ID: 11155111
- Currency symbol: ETH
- Block Explorer URL: https://sepolia.etherscan.io/ (Optional)
Once connected, you can get test Sepolia tokens from the Chainstack Faucet to use in your DApp.
A faucet is an application that distributes testnet tokens. This is an important part of the ecosystem, allowing developers to acquire tokens easily. Note that testnet tokens have no monetary value. The Chainstack faucet distributes cryptographic tokens on various testnets and even exposes an API for developers to include the faucet in their development workflow.
With these tools and your development environment set up, you're well-prepared to dive into the creation of your DApp!
Project structure
Building a DApp involves orchestrating various components, each with its distinct role, to create a cohesive application. Let's break down the files we'll be crafting for our DApp and understand their purposes:
Overview of key files:
index.html:
- Purpose: This file is the backbone of our DApp front end. It defines the structure of our webpage, including elements like buttons, input fields, and display areas.
- Content: Contains the HTML markup that lays out the visual components of our DApp. It's where users will interact with our Dapps, inputting data and triggering blockchain transactions.
style.css:
- Purpose: While index.html provides the structure, style.css gives it life and aesthetics. This file dictates the visual style of our DApp.
- Content: Contains CSS rules and properties that style our HTML elements. This includes color schemes, layouts, and responsive designs to ensure our DApp looks polished and user-friendly.
script.js:
- Purpose: The dynamic functionality of our DApp resides here. This file bridges the gap between our front end and the blockchain, enabling user interactions to translate into blockchain transactions.
- Content: Contains JavaScript code that leverages the ethers.js library. It handles events like button clicks, interacts with our smart contract, and updates the front end based on blockchain data.
SaveString.sol:
- Purpose: A smart contract is at the core of our app; it governs the logic and rules of our DApps on the blockchain.
- Content: Written in Solidity, this file defines the contract that allows users to save and retrieve strings on the blockchain. It contains functions, state variables, and rules for interacting with the stored data.
By understanding the role of each file, we can better visualize how they interplay to form our DApp. As we progress through the tutorial, we'll delve deeper into the content of each file, crafting our application piece by piece.
Building the front-end
The front end of our DApp is the visual user interface that users will interact with. It's built using standard web technologies: HTML for structure, CSS for styling, and JavaScript for functionality. Let's break down each component:
Create a new directory where you want to host your project; use your favorite IDE.
Creating the basic HTML structure
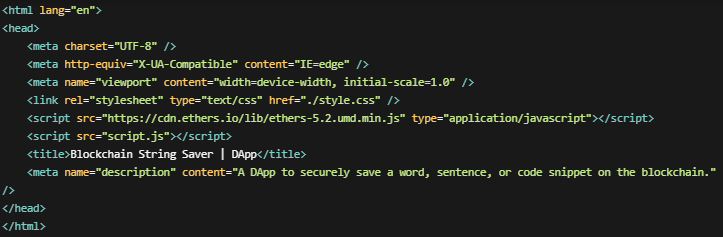
The HTML code lays out the structure of our DApp. In the new directory, create a new file named index.html and paste the following code:
Here's a breakdown:
Document structure: The <!DOCTYPE html> declaration defines the document as HTML5. The <html> element is the root element of an HTML page, and the lang="en" attribute declares English as the language of this document.
Head section: Inside the <head> tag, we have:
- Meta tags for character set, compatibility, and viewport settings.
- A link to the external CSS stylesheet,style.css, which we’ll make next.
- Scripts for the ethers.js library (which allows us to interact with the Ethereum blockchain) and our own JavaScript file, script.js.
- The title of our DApp and a meta description for search engine optimization.
Body section: The <body> tag contains all the visible content of our DApp:
Header: Introduces our DApp with a title and subtitle.
Main content: This is divided into several sections:
- An informational paragraph about the DApp.
- A section to connect the user's MetaMask wallet.
- An input section where users can input and save a string to the blockchain.
- A section where users can retrieve the string they saved.
Each section is clearly labeled and organized, making it easy for users to understand and interact with the DApp.
If you open the terminal in the directory, you can already serve and see the page in the browser, but there is no styling yet, so it would not be organized. You can serve it with the lite-server command; then, you can open it in the browser at http://localhost:3000.
Note that we import the ethers library using a CDN (Content Delivery Network), which is not the best practice security-wise, but it’s a good way for prototypes and proof of concepts.
Styling with CSS
In the same directory, create a new file named style.css and paste the following code:
Here is a breakdown:
Styling with CSS
Defining common variables: The root pseudo-class defines global CSS variables. The -flex-center variable combines common flexbox properties to center content horizontally and vertically.
Basic styling: The entire webpage's default text alignment and font are set. The primary font is Arial, with Helvetica and sans-serif as fallbacks.
Layout styling: The .grid-layout class sets the elements to display as block-level, occupying the entire width of their parent container. Despite its name, it doesn't utilize the CSS Grid system but behaves like standard block elements such as <div> or <p>.
Section styling: Each section of the DApp (information, connection, input, and retrieval) is styled with distinct background colors. The @apply rule is used to apply the -flex-center styles to these sections.
Text centering: All titles (h1, h2, h3) and content within each section are centered.
Input fields and button styling: The input field is centered and given some margin for spacing. The button styling provides a blue background with white text, a smooth interaction transition effect, and no default border. On hover, the button darkens and slightly enlarges, while on active click, it reduces in size for a tactile feedback effect.
Label styling: Labels are given additional padding for better spacing and readability.
This CSS ensures the DApp is visually appealing and user-friendly, with precise centering, spacing, and distinct colors for different sections.
We are still missing the JavaScript logic, but we’ll focus on the smart contract as we need it set up first.
Crafting a smart contract
Now it’s time for the fun part, working on the blockchain. Go to the Remix IDE and create a new file; you will find some pre-made directories in your environment; you can create a new file where you want. Create a new file named SaveString.sol and paste the following code:
Note that we have a lot of comments; in Solidity, it's good practice to provide thorough documentation for a smart contract.
Let’s breakdown the smart contract:
SaveString contract:
- The SaveString contract represents how data can be stored and retrieved on the Ethereum blockchain. It's written using Solidity version 0.8.0, as the pragma directive indicates.
- The contract starts with a license identifier (SPDX-License-Identifier: MIT) which specifies the license under which the code is released.
Explanation of the contract's functions and their purposes:
- Mapping: The contract uses a mapping data structure, savedStrings, to associate Ethereum addresses with strings. This allows each address to save a unique string. Essentially, a mapping can associate data with other data; in this case, we associate an Ethereum address with a string.
- Event: The StringSaved event is declared to notify external consumers whenever a string is saved. Events are essential for DApps as they allow for efficient and easy off-chain tracking of contract activities.
- saveString function: This function allows an Ethereum address to save a string. It updates the savedStrings mapping with the provided string and then emits the StringSaved event.
- getString function: This is a view function, meaning it doesn't modify the blockchain's state but only reads from it. It allows an Ethereum address to retrieve the string it previously saved. The function returns the string associated with the caller's address from the savedStrings mapping.
Deploying the smart contract
Building a DApp involves writing the smart contract and deploying it to a blockchain. This section will guide you through the deployment process using Remix IDE, a powerful tool for smart contract development.
Compiling the contract
Before deploying, we need to ensure our contract is error-free and ready for the blockchain. Here is the breakdown of what we will do next:
- Navigate to the Solidity Compiler tab on the left sidebar.
- Select the appropriate Solidity version; in our case, ^0.8.0 means that we can use any version between ^0.8.0 up to but not including ^0.9.0. In this case, I used 0.8.17, but feel free to choose a more updated version.
- Click on the Compile button. If there are no errors, you'll receive a confirmation that the contract was compiled successfully.
Deploying to the Sepolia testnet
Once the contract compiles correctly, we can deploy it. Select the Sepolia testnet on your MetaMask; again, you can deploy a node using Chainstack.
- Switch to the Deploy & Run Transactions tab in Remix.
- In the Environment dropdown, select Injected provider. This will allow Remix to connect to your MetaMask wallet.
- Ensure your MetaMask is connected to the Sepolia testnet and has some test Ether for transaction fees.
- Click on the Deploy button. MetaMask will prompt you to confirm the transaction.
- Once confirmed, wait for the transaction to be mined. After successful deployment, Remix will provide you with the contract's address on the Sepolia testnet.
With the contract deployed, you can now interact with it directly from Remix or integrate it into your DApp using the provided contract address.
Once you have the contract address, you can see it on Etherscan, the block explorer.
You can find a version of the contract I deployed if you want to use this one instead: 0x78343d5b366bfeB4010C2417fE28eF066F8ee49A
At this point, we are all set to continue our DApp.
JavaScript file
The JavaScript code manages the interactivity of the page. Two essential scripts are imported in the head section of our HTML:
- ethers.js: This library allows our DApp to communicate with the Ethereum blockchain. It provides functions to connect to a user's MetaMask wallet, send transactions, and interact with smart contracts.
- script.js: This is our custom JavaScript file. It will contain the logic for connecting to MetaMask, saving a string to the blockchain via our smart contract, and retrieving saved strings.
In the same directory, create a new file named script.js and paste the following code:
Let’s breakdown the code:
Smart contract configuration
The script starts by configuring the smart contract we want to interact with:
- contractAddress: This constant holds the Ethereum address where your smart contract is deployed. It's used to tell the DApps where to find the contract on the blockchain.
- contractABI: The Application Binary Interface (ABI) represents your smart contract's functions in a format your DApps can understand and interact with. It's essential to interact with smart contracts from a web application. You can use the ABI from my example directly if you did not modify the smart contract; otherwise, you can find your ABI from the Remix IDE in the compiler section.
Connecting to MetaMask
async function connect(): This asynchronous function establishes a connection between your web application and the MetaMask wallet.
- Web3Provider: This creates a new connection to the Ethereum blockchain using MetaMask.
- eth_requestAccounts: This prompts users to connect their MetaMask wallet to your DApps.
- getSigner: Retrieves the Ethereum account currently active in MetaMask and displays it in the front end.
- ethers.Contract: This creates a new instance of your smart contract in your application, allowing you to call its functions.
Interacting with the smart contract
async function saveString(): This function saves a string to the blockchain by calling the saveString function of your smart contract.
- document.getElementById("input").value: This retrieves the value (the string) the user entered into the input field on your web page.
- const txResponse = await smartContract.saveString(string);: Calls the saveString function of your smart contract, passing in the string as a parameter.
- txResponse.hash: This is used to get the transaction hash from the execution.
async function getString(): This function retrieves a string from the blockchain previously saved by the user.
- smartContract.getString(): Calls the getString function of your smart contract, which returns the string saved by the user.
- alert: Displays a pop-up alert to the user, showing them the string retrieved from the blockchain.
This code provides the essential functionality for your DApp, allowing users to save and retrieve strings on the blockchain using MetaMask and ethers.js.
Note that this code implements the basic functionality only, and many improvements can be made, like prompting a user to switch to the correct network in case a different one is selected in MetaMask or letting the user know when the transaction has been confirmed.
Testing the DApp
To ensure our DApp functions as intended, testing it in a controlled environment before deploying it to a live setting is crucial. This section will guide you through running and interacting with your DApp locally.
Running the DApp locally
Using lite-server: lite-server is a lightweight development server that serves a web app, opens it in the browser, and refreshes when HTML or JavaScript files change. It's perfect for running our DApp locally.
We already installed lite-server at the beginning of the tutorial.
Running the server: Navigate to your project directory in the terminal and run:
Your default browser should automatically open and display your DApp. If not, navigate to http://localhost:3000/.
Interacting with the DApp
Connecting MetaMask:
- Click on the Connect to MetaMask button.
- A MetaMask popup will appear, asking for permission to connect. Grant it.
- Once connected, your Ethereum address should be visible, indicating a successful connection.
Saving a string:
- Enter a word, sentence, or number into the provided input field.
- Click the Save Sentence button.
- MetaMask will prompt you to confirm the transaction. Confirm it.
- The transaction hash will appear under the field; click on it to see the transaction on Etherscan.
- Wait for the transaction to be confirmed. Depending on the network congestion, this might take a few seconds to a minute.
Retrieving the string:
- Click the Retrieve Sentence button.
- An alert will display the string you previously saved on the blockchain.
By following these steps, you should be able to run your DApp locally and interact with it, ensuring that all functionalities work as expected.
Note that the server will restart every time you edit the code; this means you must reconnect the wallet.
Important considerations
Security considerations:
While blockchain technology is renowned for its security features, it's essential to remember that all data stored on the blockchain is transparent and immutable. This means that once data is saved, it cannot be altered or deleted.
As such, it's crucial not to store sensitive or personal information on the blockchain, as anyone can access it.
Check this transaction I made and try to find what I saved!
Understanding the limitations:
The current design of our DApps has user-friendly interfaces allowing users to save a string associated with their address. However, if the same address saves a new string, it will overwrite the previous data. This limitation is inherent in our smart contract's design and is something to be aware of when interacting with the DApp.
Conclusion
In this tutorial, we explored the world of DApps and built a simple DApp that enables users to save and exchange strings on the blockchain. This achievement is just the beginning of blockchain development. To enhance this DApp, I urge you to further your understanding of blockchain technology, delve into more advanced topics, and challenge yourself to build more complex and impactful DApps.
The blockchain is a vast and ever-evolving ecosystem with endless opportunities to learn and create.
Related Hyperskill topics
like this
Create a free account to access the full topic

